The Ardour3 Manual
Welcome to Ardour
Ardour is a professional tool for working with audio and MIDI.
Welcome to Ardour
Welcome to Ardour
Ardour is a professional tool for working with audio and MIDI.
This section covers:
About Ardour
About Ardour
Ardour allows you to record and edit both audio and MIDI data, add many different kinds of effects and mix.
Things you might use Ardour for include:
- Digitally record acoustic/electric instruments or vocals
Isn't This A Really Complicated Program?
Isn't This A Really Complicated Program?
There is no point in pretending that Ardour is a simple, easy to use program. The development group has worked hard to try to make simple things reasonably easy, common tasks quick, and hard and/or uncommon things possible. There is no doubt that we have more to do in this area, as well as polishing the user interface to improve its intuitiveness and work flow characteristics. At the same time, multi-track, multi-channel, non-linear, non-destructive audio editing is a far from simple process. Doing it right requires not only a good ear, but a solid appreciation for basic audio concepts and a robust mental model/metaphor of what you are doing. Ardour is not a simple "audio recorder" - you can certainly use it to record stereo (or even mono) material in a single track, but the program has been designed around much richer capabilities than this.
Some people complain that Ardour is not "intuitive" to use - its lead developer has some thoughts on that.
Why Write a DAW for Linux?
Why Write a DAW for Linux?
It is fairly understandable that existing proprietary DAWs do not run on Linux, given the rather small (but growing) share of the desktop market that Linux has. However, when surveying the landscape of "popular operating systems", we find:
- older versions of Windows: plagued by abysmal stability and appalling security
- newer versions of Windows seem stable but still suffer from security problems
- OS X: an amazing piece of engineering that is excellent for audio work but only runs on proprietary hardware and still lacks the flexibility and adaptability of Linux.
Security matters today, and will matter more in the future as more and more live or semi-live network based collaborations take place.
Let's contrast this with Linux, an operating system which:
- can stay up for months (or even years) without issues
- is endlessly configurable down to the tiniest detail
- is not owned by any single corporate entity, ensuring its life and direction are not intertwined with that of a company (for a contrary example, consider BeOS)
- is fast and efficient
- runs on almost any computing platform ever created, including old "slow" systems and new "tiny" systems (e.g. Raspberry Pi)
- is one of the most secure operating systems "out of the box"
More than anything, however, Ardour's primary author uses Linux and wanted a DAW that ran there.
Having written a DAW for Linux, it turned out to be relatively easy to port Ardour to OS X, mostly because of the excellent work done by the JACK OS X group that ported JACK to OS X. Although OS X has a number of disadvantages compared to Linux, its ease of use and its presence in many studios already makes it a worthwhile platform.
Why is it called Ardour?
Why is it called Ardour?
The name "Ardour" came from considerations of how to pronounce the acronym HDR(Hard Disk Recorder). The most obvious attempt sounds like a vowelless "harder" and it then was then a short step to an unrelated by slightly homophonic word:
ardour “ n 1: a feeling of strong eagerness (usually in favor of a person or cause); "they were imbued with a revolutionary ardor"; "he felt a kind of religious zeal" [syn: ardor, elan, zeal] 2: intense feeling of love [syn: ardor] 3: feelings of great warmth and intensity; "he spoke with great ardor" [syn: ardor, fervor, fervour, fervency, fire, fervidness] ”
Given the work required to develop Ardour, and the personality of its primary author, the name seemed appropriate even without the vague relationship to HDR.
Years later, another interpretation of "Ardour" appeared, this time based on listening to non-native English speakers attempt to pronounce the word. Rather than "Ardour", it became "Our DAW", which seemed poetically fitting for a Digital Audio Workstation whose source code and design belongs to a group of collaborators.
Why write another DAW?
Why write another DAW?
There are already a number of excellent digital audio workstations. To mention just a few: ProTools, Nuendo, Samplitude, Digital Performer, Logic, Cubase (SX), Sonar, along with several less well known systems such as SADIE, SAWStudio and others. Each of these programs has its strengths and weaknesses, although over the last few years most of them have converged on a very similar set of core features. However, each of them suffers from two problems when seen from the perspective of Ardour's development group:
- they do not run natively on Linux
- they are not available in source code form, making modifications, improvements, bugfixes by technically inclined users or their friends or consultants impossible.
About Ardour documentation
About Ardour documentation
Conventions Used In This Manual
This section covers some of the typographical and language conventions used in this manual.
Keyboards and Modifiers
Keyboard bindings are shown like this: s or x. Ctrl-x means "press the Ctrl, keep it pressed and then also press the x key. You may also see key combinations such as Ctrl-Shift-e, which mean that you should press the Ctrl key, then while keeping it pressed also press the Shift key and then while keeping them both pressed, finally press the e key.
Note that different platforms have different conventions for which modifier key (Control or Command) to use as the primary or most common modifier. When viewing this manual from a machine identifying itself as running OS X, will see Cmd- where appropriate. On other machines you will see Ctrl-
Menu Items
Menu items are indicated like this: Top > Next > Deeper Each >-separated item indicates an item on a nested (sub) menu.
Preference/Dialog Options
Choices in various dialogs, notably the Preferences and Properties dialog, are indicated like this: Edit > Preferences > Audio > Some Option Each successive >-separated item indicates either a (sub) menu or tabbed dialog navigation. The final item is the one to choose/select/deselect, etc.
Notes
Important notes about things that might not otherwise be obvious are shown in this format
"Context-click"
Many times the term context-click is used to indicate that you should (typically) right-click on a particular element of the graphical user interface. Although right-click is the common, default way to do this, there are other ways to accomplish the same thing - this term refers to any of them, and the result is always that a menu specific to the item you clicked on will be displayed.
Mouse Buttons
We refer to mouse buttons as Left, Middle and Right. Ardour can use additional buttons, but they have no default behaviour in the program.
"The Pointer"
When the manual refers to the "pointer", it means the on-screen representation of the mouse position or the location of a touch action if you are using a touch interface.
Additional Resources
Additional Resources
In addition to this documentation, you may to check a variety of other resources.
Release Notes
The Ardour Forums
Information about Ardour Support
The Ardour Users Mailing List
Introducing Ardour
Introducing Ardour
This chapter gives you a conceptual overview of Ardour and provides an example of a common workflow when creating music with the program.
This chapter covers:
Creating Music with Ardour
Creating Music with Ardour
Ardour can be used in many different ways, from extremely simple to extremely complex. Many projects will be handled using the following kind of workflow.
Stage 1: Creating Your Project
The first step is to create a new session, or open an existing one. A session consists of a folder containing a session file that defines all the information about the session. All media files used by the session can be stored within the session folder.
More details on sessions can be found in Working With Sessions.
Stage 2: Creating and Importing Audio and MIDI data
Once you have a session, you will want to add some audio and/or MIDI material to it, which can be done in one of 3 ways:
- Record incoming audio or MIDI data, either via audio or MIDI hardware connected to your computer, or from other applications.
- Create new MIDI data using the mouse and/or various dialogs
- Import existing media files into the session
MIDI recordings consist of "performance data" ("play note X at time T") rather than actual sound. As a result, they are more flexible than actual audio, since the precise sound that they will generate when played depends on where you send the MIDI to. Two different synthesizers may produce very different sound in response to the same incoming MIDI data.
Audio recordings can be made from external instruments with electrical outputs (keyboards, guitars etc.) or via microphones for acoustic instruments.
Ardour uses the JACK Audio Connection Kit for all audio and MIDI I/O, which means that recording audio/MIDI from other applications is fundamentally identical to recording audio/MIDI from your audio/MIDI hardware.
Stage 3: Editing and Arranging
Once you have some material within the session, you can start to arrange it in time. This is done in one of the two main windows of Ardour, the Editor window.
Your audio/MIDI data appears in chunks called "regions", which are arranged into horizontal lanes called "tracks". Tracks are stacked vertically in the Editor window. You can copy, shorten, move, and delete regions without changing the actual data stored in the session at all - Ardour is a non-destructive editor. (Almost) nothing that you do while editing will ever modify the files stored on disk (except the session file itself).
You can also carry out many transformations to the contents of regions, again without altering anything on disk. You can alter/move/delete MIDI notes, and remove silence from audio regions, for example.
Stage 4: Mixing and Adding Effects
Once you have the arrangement of your session mostly complete, you will typically move on to the mixing phase. Mixing is a broad term to cover the way the audio signals that your session generates during playback and processed and added together into a final result that you actually hear. It can involve altering the relative levels of various parts of the session, adding effects that improve or transform certain elements, and others that bring the sound of the whole session to a new level.
Ardour will allow you to automate changes to any mixing parameters (such as volume, panning, and effects controls) - it will record the changes you make over time, using a mouse or keyboard or some external control device, and can play back those changes later. This is very useful because often the changes you need, even for just one track, will vary in one part of a session compared to another - rather than a single new setting for the volume, you will often need increases followed by decreases (for example, to track the changing volume of a singer). Using automation can make all of this relatively simple.
Stage 5: Export
Once you are really satisfied with the arrangement and mix of your session, you will typically want to produce a single audio file that contains a ready-to-listen to version of the work. Ardour will allow you to export audio files in a variety of formats (simultaneously in some cases). This exported file would typically be used in creating a CD, or be the basis for digital distribution of the work.
OI course sometimes you will want to do export material that isn't finished yet, for example to give a copy to someone else to try to mix on their own system. Ardour will allow you to export as much of a session as you want, at any time, in any supported format.
Understanding Basic Concepts and Terminology
Understanding Basic Concepts and Terminology
This section will help you get acquainted with the basic terminology and concepts associated with Ardour. More detailed information on each aspect of the program is provided in later chapters.
Sessions
An Ardour session is a container for an entire project. A session may contain an arbitrary number of tracks and busses consisting of audio and MIDI data, along with information on processing those tracks, a mix of levels, and everything else related to the project. A session might typically contain a song, or perhaps an entire album or a complete live recording.
Ardour sessions are held in directories; these directories contain one or more session files, some or all of the audio and MIDI data and a number of other state files that Ardour requires. The session file describes the structure of the session, and holds automation data and other details.
Ardour's session file is kept in XML format, which is advantageous as it is somewhat human-readable, and human-editable in a crisis. Sound files are stored in one of a number of optional formats, and MIDI files as SMF (standard MIDI format).
It is also possible for Ardour sessions to reference sound and MIDI files outside the session directory.
Ardour has a single current session at all times; if Ardour is started without specifying one, it will offer to load or create one.
More details can be bound at Working With Sessions.
Tracks
A track is a concept common to most DAWs, and used also in Ardour. Tracks can record audio or MIDI data to disk, and then replay it with processing. They also allow the audio or MIDI data to be edited in a variety of different ways.
In a typical pop production, one might use a track each for the kick drum, another for the snare, more perhaps for the drum overheads and others for bass, guitars and vocals.
Ardour can record to any number of tracks at one time, and then play those tracks back. On playback, a track's recordings may be processed by any number of plugins, panned, and its level altered to achieve a suitable mix.
A track's type is really only related to the type of data that it stores on disk. It is possible, for example, to have a MIDI track with a synthesizer plugin which converts MIDI to audio. Even though the track remains ‘MIDI’, in the sense that its on-disk recordings are MIDI, its output may be audio-only.
More details can be bound at Working With Tracks.
Regions
A track may contain many segments of audio or MIDI. Ardour contains these segments in things called regions, which are self-contained snippets of audio or MIDI data. Any recording pass, for example, generates a region on each track that is enabled for recording. Regions can be subjected to many editing operations; they may be moved around, split, trimmed, copied, and so on.
More details can be bound at Working With Regions.
Playlists
The details of what exactly each track should play back is described by a playlist. A playlist is simply a list of regions; each track always has an active playlist, and can have other playlists which can be switched in and out as required.
More details can be bound at Working With Playlists.
Busses
Busses are another common concept in both DAWs and hardware mixers. They are similar in many ways to tracks; they process audio or MIDI, and can run processing plugins. The only difference is that their input is obtained from other tracks or busses, rather than from disk.
One might typically use a buss to collect together the outputs of related tracks. Consider, for example, a 3-track recording of a drum-kit; given kick, snare and overhead tracks, it may be helpful to connect the output of each to a bus called ‘drums’, so that the drum-kit's level can be set as a unit, and processing (such as equalisation or compression) can be applied to the mix of all tracks.
Plugins
Ardour allows you to process audio and MIDI using any number of plugins. These are external pieces of code, commonly seen as VST plugins on Windows or AU plugins on Mac OS X. Generally speaking, a plugin is written using one (and maybe more) standards. Ardour's plugin support is for the following standards:
- LADSPA
- the first major plugin standard for Linux. Many LADSPA plugins are availble, mostly free and open-source.
- LV2
- the successor to LADSPA. Lots of plugins have been ‘ported’ from LADSPA to LV2, and also many new plugins written.
- VST
- Ardour supports VST plugins that have been compiled for Linux.
- AudioUnit (AU)
- Mac OS X versions of Ardour support AudioUnit (AU) plugins.
Ardour has some support for running Windows VST plugins on Linux, but this is rather complicated, extremely difficult for the Ardour developers to debug, and generally unreliable. If it is at all possible, you are strongly advised to use native LADSPA, LV2 or Linux VST plugins on Linux, or AU on Mac OS X.
More details can be bound at Working With Plugins.
Setting Up Your System
Setting Up Your System
Using a general purpose computer for recording digital audio is not always trivial. This chapter will guide you through the basic steps and help you with some of the most common pitfalls.
This chapter covers the following:
The Right Computer System for Digital Audio
The Right Computer System for Digital Audio
It would be nice to think that you could just go and buy any computer, install a bit of software on it and start using it to record and create music. This idea isn't wrong, but there some important details that it misses.
Any computer that you can buy today (somewhere around the end of 2012) is capable of recording and processing a lot of audio data. It will come with a builtin audio interface that can accept inputs from microphones or electrical instruments. It will have a disk with a huge amount of space for storing audio files.
When you are recording, editing and mixing music, you generally want to work with very little delay between the time that a sound is generated and when you can hear it. When the audio signal flows through a computer, that means that the computer has to be able to receive the signal, process it and send it back out again as fast as possible. And that is where it becomes very important what computer system you have, because it is absolutely not the case that any computer can do this job well.
Routing audio through a computer will always cause some delay, but if it is small, you will generally never notice it. There are also ways to work in which the delay does not matter at all (for example, not sending the output from the computer to speakers).
The delay or "latency" that you want for working with digital audio is more typically in the 1-5msec range. For comparison, if you are sitting 1m (3ft) from your speakers, the time the sound takes to reach your ears is about 3msec. Any modern computer can limit the delay to 100msec. Most can keep it under 50msec. Many will be able to get down to 10msec without too much effort. If you try to reduce the delay on a computer that cannot meet your goal, you will get clicks and glitches in the audio, which is clearly extremely undesirable.
Many, many things can affect the lowest latency that a computer can support.
Hardware-related Considerations
- Video interface
- Poorly engineered video interfaces (and/or their device drivers) can "steal" computer resources for a long time, preventing the audio interface from keeping up with the flow of data
- Wireless interface
- Poorly engineered wireless networking interfaces (and/or their device drivers) can also block the audio interface from keeping up with the flow of data
- USB ports
- If you are using an audio interface connected via USB, and sometimes even if you are not, the precise configuration of your system's USB ports can make a big difference. There are many cases where plugging the interface into one port will work, but using different USB port results in much worse performance. This has been seen even on Apple systems.
- CPU speed control
- Handling audio with low latency requires that your processor keeps running at its best performance (speed) at all times. Many portable systems try to regulate processor speed in order to save power - for low latency audio, you want this totally disabled, either in the BIOS or at the OS level
- Excessive Interrupt Sharing
- If your audio interface is forced by your computer to share an "interrupt line" (basically a way to tell the CPU that something needs its attention) with too many, or the wrong, other devices, this can also prevent the audio interface from keeping up with the flow of data. In laptops it is generally impossible to do anything about this. In many desktop systems, it is possible at the BIOS level to reassign interrupts to workaround the problem.
- System Management Interrupts (SMIs)
- SMIs are interrupts sent by the motherboard to tell the computer about the state of various hardware. They cannot be (safely) disabled, but they can also take a (relatively) long time to process. It is better to have a motherboard which never sends SMIs at all - this is also a requirement for realtime stock trading systems, which have similar issues with latency.
- Excessive (bass) vibration
- This doesn't affect the flow of data to/from the audio interface, but it can cause the flow of data to/from your disk storage to become much slower. If you are going to use a computer in an environment with live sound, make sure to place it so that the disk is not subject to noticeable bass vibration. What actually happens is that the vibrations cause the mechanism inside the disk to detect read errors, and this forces a retry of the reading from the disk itself. Retrying over and over massively reduces the rate at which data can be read from the disk. Avoid this.
The Mouse
The Mouse
Ardour is designed to work best with a 3 button mouse equipped with a scroll wheel.
It can be used with a 2 button mouse or touchpad, but at least 2 key operations will not (easily) be available to you:
- time-constrained region copying
- MIDI bindings created by "learning" them from incoming MIDI
You are strongly encouraged to invest in a 3 button mouse. You will find that a good quality mouse (especially one with a weighted, latchable scroll wheel) will make your use of Ardour vastly more efficient. They are cheap, and time is not.
Using External MIDI Devices
Using External MIDI Devices
Connecting Audio and MIDI Devices
Connecting Audio and MIDI Devices
MIDI on OS X
CoreMIDI is a part of any OS X system and provides the device drivers and libraries needed by MIDI applications.
You will need to ensure that you are running a version of JACK for OS X that has a working CoreMIDI - JACK MIDI bridge. This first appeared in version 0.89 of JackOS X.
MIDI on Linux
Ensure that a2jmidid is running
a2jmidid is an application that "bridges" between the system MIDI ports and JACK.
First you should be sure that there is no ALSA sequencer support enabled in jack. To do that open qjackctl's Setup window.
In the Settings tab set the MIDI Driver drop down to the none option.
Then go to the Misc tab and uncheck the Enable ALSA Sequencer support option.
Now it's time to restart your jack server before going on.
Checking for a2jmidid availability
First thing is checking if a2jmidid is already installed in your system. To do it first start your jack server and then call
a2jmidid -e
from the command. If a2jmidid is there go on with Checking surface control MIDI ports. Otherwise install the newest a2jmidid available and try again.
Checking surface control MIDI ports
After starting a2jmidid your control surface MIDI ports should appear in qjackctl's Connections window on the MIDI tab under a2j. If it does go on to the next step: Automatically calling a2jmidid when starting jack. If it doesn't you have to troubleshoot why it didn't. (How to troubleshoot a2jmidid?)
Automatically calling a2jmidid when starting jack
It's troublesome to have to manually start a2jmidid by hand each time you start jack. Here is one way to do it automatically. This step isn't mandatory, it's just a convenience. If you are not interested you can go on to the next step Enabling Ardour's mackie control ports in qjackctl.
Create a script that calls jack if you aren't using one yet. In it change the line that calls jack to have an ampersand at it's end like that:
/usr/bin/qjackctl &
In this case I call qjackctl that starts jack so I include the ampersand in qjackctl's call. If you call jack directly, put the ampersand at the end of it's call line.
Now include the following lines after the line that calls jack:
/usr/bin/sleep 5
/bin/bash -c "/usr/bin/a2jmidid -e" &
All you have to do now is use your new script to call jack.
Ardour's Interface
Ardour's Interface
In Ardour, you work in two main windows: the Editor window and the Mixer window.

The Editor window includes the editor track "canvas" where you can arrange audio and MIDI data along a timeline. This is the window you will be in while editing and arranging a project. The window has a general "horizontal" sense to it: the timeline flows from left to right, the playhead showing the current position in the session moves from left to right - the window really represents "time" in a fairly literal way.

The Mixer window on the other hand represents signal flow and is the window you will probably be using most when mixing a session. It includes elements called "channel strips" for each track and bus in your session. It has a general "vertical" sense to it: signals flow from the top of each channel strip through the processing elements in the strip to reach the output listed at the bottom.
It is possible to show a single channel strip in the editor window, and some people find this enough to work on mixing without actually opening the mixer window. Most of the time though, you will want both of these windows at various stages of a session's lifetime - sometimes you'll be focused on editing, sometimes on mixing and possibly some of the time on both.
Starting Ardour
Starting Ardour
There are several ways of starting Ardour, which may vary depending on which platform you are using it on.
- double-click the Ardour icon in your platfom's file manager (e.g. Nautilus on Linux, Finder on OS X)
- double click on an Ardour session file in your platform's file manager
- on Linux, you can also start Ardour on the command line
When Ardour is run for the very first time, a special dialog is displayed that will ask you several questions about your setup. You will not be asked these questions again, but you can always modify your choices via the Preferences dialog.
In general, it is sensible to start JACK before you run Ardour. This is not necessary, but will provide you with more control and options over JACK's operation.
If you open Ardour without specifying an existing session it will display the "New Session" dialog. If JACK is not already running, there will be an extra "Audio Engine" tab in that dialog to configure JACK, which Ardour will start automatically.
If you did specify an existing session but JACK is not already running, the "New Session" dialog will contain just the Audio Engine tab.
Starting Ardour From the Command Line
Starting Ardour on the command line (Linux)
Like (almost) any other program on Linux, Ardour can be started on the command line.
- type the following command in a terminal window
ardour3
- to start Ardour with an existing session, type the following command in a terminal window
ardour3 /path/to/session
replacing /path/to/session with the actual path to your session. You can specify either the session folder or any session file inside the folder (including snapshots).
- to start Ardour with a new, named session, type the following command in a terminal window
ardour3 -N /path/to/new/session
replacing /path/to/new/session with the name of the folder where you want the session stored.
Other Command Line Options
Basic GUI Operations
Basic GUI Operations
Ardour has a number of different techniques to offer when you interact with it. This chapter provides information on basic techniques for entering text, making selections, and using shortcuts.
This chapter covers the following:
Interface Elements
Interface Elements
Checkboxes
Buttons
Pull Down Menus
Pop Up Menus
Context Menus
Browsers
Key Bindings
Key Bindings
Almost every available function in Ardour can be executed via a key binding (or OSC command). There are many more functions available than there are keys on even the largest current computer keyboards, so only a subset of them are bound to keys by default.
Selection Techniques
Ardour follows the conventions used by most other computer software (including other DAWs) for selecting objects in the GUI.
Selecting individual objects
Clicking on object (sometimes in a particular part of its on-screen representation) will select the object, and deselect other similar objects.
Selecting multiple (similar) objects
click on an object toggles it selected status, so using click on a series of objects will select (or deselect) each one of them. You can construct completely arbitrary selections with this technique.
Selecting a range of objects
In cases where the idea of "select all objects between this one and that one" makes sense, you can click one object and then Shitft click another to select both of them as well as all object in between them.
Range Selection
These basic principles apply to Range Selection - click-drag to select a range, drag to create multiple ranges and shift-click to extend a range to cover a wider area.
Tooltips
By default, Ardour will often show helpful information about the purpose and use of most GUI control (buttons etc.) if you position the pointer over the GUI control and leave it there momentarily. These can be a good way to discover the purpose of many aspects of the GUI.
This can be distracting for experienced users, who may opt to disable it via Edit > Preferences > GUI > Show tooltip if mouse hovers over a control.
Undo/Redo for Editing
Undo/Redo for Editing
It is very common to make changes while editing that you did not intend to, or that you later decide were the wrong choice. All changes to the arrangement of session components (regions, control points) along the timeline can be undone (and then redone). The default keybinding for undo is Ctrl/Cmd-z and for redo is Ctrl/Cmd-r (these match the conventions of most other applications that provide undo/redo.
Changes are also saved to the session history file, so that undo/redo is possible even if you close the session and reopen it (even if you quit Ardour in between).
The maximum number of changes that can be undone can be altered in the Editing tab of the Preferences dialog. The maximum number of changes stored in the history file is a separate parameter, and can also be set in the same place.
Using the Mouse
Clicking
Throughout this manual, the term "click" refers to the act of pressing and releasing the leftmost mouse button (technically the button that is identified as button number 1 - your operating system may allow this be reassigned). This action is used to select objects, activate buttons, turn on/off choices, popup menus and so forth.
On touch surfaces, it also corresponds to a regular, single-finger tap on the GUI.
Right Clicking
Throughout this manual, the term "right-click" refers to the act of pressing and releasing the rightmost mouse button (technically the button that is identified as button number 3 - your operating system may allow this be reassigned). This action is used to pop up "context menus" (hence the term "context click", which you will also see). It is also used by default in combination with the shift key for deleting objects within the editor window.
Double Clicking
A "double click" refers to two rapid press/release actions on the leftmost mouse button. The time interval between the two press/release actions that determines whether this is seen as two clicks or one double click is controlled by your system preferences, not by Ardour.
Drags
Throughut this manual, the term "drag" primarily refers to the act of pressing the leftmost mouse button, then moving the mouse with the button held down, and then releasing the button. On touch surfaces, this term also corresponds to a normal single finger touch-motion-release action.
Ardour also uses the middle mouse button for certain kinds of drags, which will be referred to as "middle-drag" - these are identical to a normal drag except that they involve using the middle button rather than the left button.
Modifiers
There are many actions in Ardour that can be carried out using a mouse button in combination with a "modifier key". When the manual refers to Ctrl-click, it means that you should first press the Control key, then carry out a normal click while the Control key is held down, and then finally release the Control key. Available modifiers depend on the platform you are using Ardour on:
Linux Modifiers
- Control (Ctrl)
- Shift
- Alt
- Mod2
- Mod3
- Mod4
- Mod5
Mod2 typically correspond to the NumLock key on many systems. On most Linux systems, there are no keys that will function as modifiers Mod3, Mod4 or Mod5 by default, but they can be setup using xmodmap(1). This can be rather useful.
OS X Modifiers
- Command (Cmd)
- Control (Ctrl)
- Option (Alt)
- Shift
Mouse Wheel/Scroll
Ardour can make good use of a scroll wheel on your mouse, which can be utilized for a variety of purposes. Scroll wheels can generate both vertical scroll events (ScrollUp and ScrollDown) and/or horizontal events (ScrollLeft and ScrollRight). When appropriate, Ardour will differentiate between these two different scroll axes. Otherwise it will interpret ScrollDown and ScrollLeft as equivalent and similarly interpret ScrollUp and ScrollRight as equivalent.
Typically, scrolling is used to adjust continuous controls (e.g. faders/knobs), or to scroll vertically or horizontally.
Cut and Paste Operations
Cut and Paste Operations
The clipboard is a holder for various kinds of objects (regions, control events, plugins) that is used during cut-n-paste operations.
Cut
A cut operation removes selected objects and places them in the clipboard. The existing contents of the clipboard are overwriten. The default key binding is x.
Copy
A copy of the selected objects are placed in clipboard. There is no effect on the selected objects. The existing contents of the clipboard are overwritten. The default key binding is c.
Paste
The current contents of the clipboard are inserted into the session, using the current edit point as the reference point. The contents of the clipboard remain unchanged. The default key binding is v.
Deleting Objects
Within the Editor window (and to some extent within the Mixer window too), there are several techniques for deleting objects (regions, control points, and more).
Using the mouse and keyboard
Select the object(s) and then press the Delete key. This does not put the deleted object(s) into the cut buffer, so they cannot be pasted elsewhere.
Using normal cut and paste
Select the object(s) and then press x. This puts the deleted object(s) into the cut buffer so that they can be pasted elsewhere.
Using just the mouse
By default, Shift-right-click will delete the clicked-upon object. Like the Delete key, this does not put the deleted object(s) into the cut buffer, so they cannot be pasted elsewhere.
The modifier and mouse button used for this can be controlled via Edit > Preferences > User Interaction > Delete using .... Any modifier and mouse button combination can be used.
Introducing the Editor Window
Introducing the Editor Window
Editor Lists
Editor Lists
At the right of the editor is an optional area which provides one of a range of useful lists of parts of your session. It is not shown by default when you first start using Ardour. The list can be hidden or shown using the Show Editor List option from the View menu. The very right-hand side of the list gives a selection of tabs which are used to choose the list to view. The left-hand border of the list can be dragged to vary the width of the list.
Ranges & Marks List
Ranges & Marks List
See this section for information on this list/section of the Editor Lists.
Region List
Region List
The region list shows all the regions in the session. The left-hand column gives the region name, and there are a range of times given for information. At the right of the list are four columns of flags that can be altered:
The region list shows all the regions in the session. The left-hand column gives the region name, and there are a range of times given for information. At the right of the list are four columns of flags that can be altered:
- L
- whether the region position is locked, so that it cannot be moved.
- G
- whether the region's position is ‘glued’ to bars and beats. If so, the region will stay at the same position in bars and beats even if the tempo and/or time signature change.
- M
- whether the region is muted, so that it will not be heard.
- O
- whether the region is opaque; opaque regions ‘block’ regions below them from being heard, whereas ‘transparent’ regions have their contents mixed with whatever is underneath.
Hovering the mouse pointer over a column heading shows a tool-tip which can be handy to remember what the columns are for.
A handy feature of the region list is that its regions can be dragged and dropped into a suitable track in the session.
Snapshot List
Snapshot List
This list gives the snapshots that exist of this session. Clicking on a snapshot name will load that snapshot.
See Working with Sessions for more information on snapshots.
Track & Bus Group List
Track & Bus Group List
This shows the track/bus groups that exist in the session. These groups allow related tracks to share various properties (such as mute or record enable state). For full details, see the section called “Track and bus groups”.
The columns in this list are as follows:
- Col
- the colour that the group uses for its tab in the editor.
- Name
- the group name.
- V
- whether the tracks and busses in the group are visible.
- On
- whether the group is enabled.
- G
- ticked if the constituents of the group are sharing gain settings.
- Rel
- ticked if shared gains are relative.
- M
- ticked if the constituents share mute status.
- S
- ticked if the constituents share solo status.
- Rec
- ticked if the constituents share record-enable status.
- Mon
- whether the constituents share monitor settings.
- Sel
- whether the constituents are selected together.
- E
- whether edits to the constituents are performed to all others.
- A
- whether the constituents share active status.
Tracks & Busses List
This lists the tracks and busses that are present in the session. The list order reflects the order in the editor, and you can drag-and-drop track or bus names in the editor list to re-order them in the editor. The columns in the list can all be clicked to alter the track/bus state, and they represent the following:
- V
- whether the track or bus is visible; they can be hidden, in which case they will still play, but just not be visible in the editor; this can be useful for keeping the display uncluttered.
- A
- whether the track or bus is active; unactive tracks will not play, and will not consume any CPU.
- I
- for MIDI tracks, whether the MIDI input is enabled; this dictates whether MIDI data from the track's inputs ports will be passed through the track.
- R
- whether the track is record-enabled.
- M
- whether the track is muted.
- S
- track solo state.
- SI
- track solo-isolated state.
- SS
- solo safe state.
As with the region list, hovering the mouse pointer over a column heading shows a tool-tip which can be handy to remember what the columns are for.
The Editing Toolbar
The Editing Toolbar
Mouse Modes
- Object Tool
- Used for selecting, moving, deleting and copying objects. See below for a full description.
- Range Mode
- When in range mode, the mouse pointer appears as a vertical line whenever it is over the track canvas or the rulers. The mouse will now be able to select a point or range of time. Time ranges can be selected over one or several tracks, depending ond the selection of your tracks.
If none of your track is selected, the Range Tool will operate on all the session track visualized in the Editor.
If you want to operate just some track, select the track you want to edit with the Range Tool.
- Zoom Tool
- When in zoom mode, the mouse pointer appears as a magnifying glass whenever it is over the track canvas or the rulers. This mode is used to zoom the display to any range that is determined by clicking and dragging the Button1 to specify the range. You can also utilize a single click with Button1 to zoom in by one level focused on the mouse cursor, likewise a single click on Button3 will zoom out by one level focused on the mouse.
- Region Gain Tool
- When in gain edit mode, the mouse pointer will change to cross-hairs. You can then click within a region to change the gain automation for that region. This automation is separate from fader automation for individual tracks, but works in conjunction with the track's fader. This automation will remain locked to the region's time, so if the region is moved, the region gain automation is moved along with it.
- TimeFX Tool
- When in timefx mode, the mouse pointer appears as a distinctive 'expanding' illustration whenever it is over the track canvas or the rulers. This mode is used to resize regions using a timestretch algorithm. It is utilized by clicking on an edge of a region of audio and dragging it one way or the other to either stretch or shrink the region.
- Audition Tool
- Clicking a region using the "audition" tool will audition the region.
You can also "scrub" with this tool by clicking and dragging in the direction you wish to listen. The amount you drag in one direction or the other will determine the playback speed.
- Draw Tool
- Internal/Region Edit Mode
Object Tool
When in object mode, the mouse pointer appears as a hand whenever it is over the track canvas or the rulers. The mouse can now be used to select and perform operations on objects such as regions, markers etc. This is the most commonly utilized mode in Ardour, as it allows you to select and move regions, as well as modify automation points on the automation tracks.
- Selecting Regions
- Resizing Regions
- Moving Regions
- Editing Fade In and Fade Out
Smart Mode
The "Smart Mode" button to the left of the mouse mode buttons modifies "Object Tool" mode. When enabled, the mouse behaves as if it is in "Range Tool" mode in the upper half of a region, and in "Object Tool" mode in the lower half.
The Transport Bar
The Transport Bar
Introducing the Mixer Window
Introducing the Mixer Window
Using Ardour Clock Displays
Using Ardour Clock Displays
Clocks in Ardour are the basic way of displaying time values precisely. In many cases, they are also one way to edit (change) time values, and in a few cases, the only way. All clocks share the same basic appearance and functionality, which is described below, but a few clocks serve particularly important roles.
Transport Clocks
In the transport bar of the editor window there are two (or, if you are on a very small screen, just one) clocks that display both the current position of the playhead, and additional information related to transport control and the timeline. These are called the "transport clocks"; the leftmost one is the primary transport clock and the rightmost one is the secondary transport clock. They look like this:

Editing the time in the transport clocks will reposition the playhead in the same way that various other editing operations will.
The Big Clock
Under the Windows item in the main menu you will find the "Big Clock" window, which also shows the playhead position in a big, fully resizable window. The big clock is very useful when you need to work away from the screen but still want to see the playhead position clearly (such as when working with a remote control device across, or in another, room). The big clock will also change its visual appearance to indicate when active recording is taking place. Below on the left is a screenshot showing a fairly large big clock window filling a good part of the display, and on the right, the same clock during active recording.


The Special Role of the Secondary Transport Clock
There are a number occasions when Ardour needs to display time values to the user but there is no obvious way to specify what units to use. The most obvious is in the big cursor that appears when dragging regions. For this and other similar cases, Ardour will display time using the same units as the secondary clock.
Why are there two transport clocks
Having two transport clocks lets you see the playhead position in two different time units without having to change any settings. For example, you can see the playhead position in both timecode units and BBT time.
Selection and Punch Clocks
The transport bar also contains a set of 5 clocks that show the current selection range and punch ranges. Clicking on the punch range clocks will locate to either the beginning or end of the punch range. Similarly, clicking on the range clocks will locate to either the beginning or end of the current selection. In this screen shot there is no current selection range, so the selection clocks show an "off" state.

Clock Modes
Every clock in Ardour has four different modes it can be set to, each of which displays time using different units. You can change the clock mode by right-clicking on the clock and selecting the desired mode from the menu. Some clocks are entirely independent of any other clock's mode; others are linked so that changing one changes all clocks in that group. The different modes are:
- Timecode
- Time is shown as Hours:Minutes:Seconds:Frames, measured from the timecode zero point on the timeline (which may or may not correspond to the session start and/or absolute zero on the timeline). The frames per second (FPS) value is dictated by either the session FPS setting, or, if slaved to an external timecode master, the master. In the transport clocks, the FPS value is shown below the time display, along with an indication of the current timecode source (INT means that Ardour is its own timecode source)
- BBT
- Time is shown as Bars:Beats:Ticks, indicating musical time measured from the start of the session. The transport clocks show the current tempo (as bpm) and meter below the time display
- Minutes:Seconds
- Time is shown as Hours:Minutes:Seconds.Milliseconds, measured from the absolute start of the timeline (ignoring the session start and any timecode offsets).
- Samples
- Time is shown as a sample count from the absolute start of the timeline (ignoring the session start and any timecode offsets). The number of samples per second is given by the current sample rate, and in the transport clocks, this rate is shown below the time display along with any pullup/pulldown adjustment.
Special Modes for the Transport Clocks
In addition to the time-unit modes mentioned above, each of the two transport clocks (if you work on a small screen, you may only have one) can be independently set to display "Delta to Edit Point" in whatever time units its current mode indicates. This setting means that the clock shows the distance between the playhead and the current edit point, and it may show a positive or negative value depending on the relationship between these two points. The clocks will use a different color when in this mode to avoid confusion about the displayed value.
To switch either (or both!) of the transport clocks into this mode, use Edit->Preferences->Transport and select or de-select the relevant check-button.
Note that when set into this "Delta to Edit Point" mode, the transport clocks cannot be edited.
Changing clock values with the keyboard
New values for the clock can be typed from the keyboard after clicking on the relevant clock. Clicking on the clock will show a thin vertical cursor bar just to the right of the next character to be overwritten. Enter time in the same order as the current clock mode - if the clock is in Timecode mode, you need to enter hours, minutes, seconds, frames. So, to change to a time of 12:15:20:15 you would type 1 2 1 5 2 0 1 5. Each number you type will appear in a different color, from right to left, overwriting the existing value. Mid-edit, after typing 3 2 2 2 the clock might look like this:

To finish the edit, press the enter/return or tab key. To exit an edit without changing the clock press the escape key. If you mis-type an entry so that the new value would be illegal (for example, resulting in more than 30 frames when Timecode is set to 30 frames per second), the clock will reset at the end of the edit, and move the cursor back to the start so that you may begin again.
To end an edit without changing the clock press the escape key.
Avoiding the mouse entirely
There is a shortcut available for those who wish to be able to edit the transport clocks entirely without the mouse. It can be found in the keybinding editor under "Transport" called "Focus On Clock". If bound to a key (the divide key on a keypad is the default at time of writing), then pressing that key is equivalent to clicking on the primary (left) transport clock, and editing can begin immediately.
Entering Partial Times
One detail of the editing design that is not immediately obvious is that it is possible to enter part of a full time value. Suppose that the clock is in BBT mode, and displaying 024|03|0029 and you want to alter the value to be the first beat of the bar. Click on the clock and type 0 1 0 0 0 0. Similarly, if it is in Minutes:Seconds mode, and displaying 02:03:04.456 and you want to get to exactly 2 hours, click on the clock and type 0 0 0 0 0 0 0 to reset the minutes, seconds and milliseconds fields.
Entering Delta Times
You can also type values into the clock that are intended as a relative change, rather than a new absolute value. Simply end the edit by pressing the + or - keys (the ones on any keypad will also work). Using the plus key will add the entered value to the current value of the clock; using minus will subtract it. For example, if the clock is in Samples mode and displays 2917839, you move it back 2000 samples by typing 2 0 0 0 and then the - key rather than enter/return/tab.
Changing clock values with the mouse
Using a scroll wheel
Position the mouse pointer over the clock, and move the scroll wheel. Moving the scroll wheel away from you will increase the value shown on the clock, moving it towards you will decrease the value shown on the clock. The step size is determined by which field of the clock you position the mouse over. If the clock is in Timecode mode and the mouse pointer is over the Seconds field, the clock value will increase or decrease by one second at a time. If you move the mouse point to the Hours field, the value will increase or decrease by one hour at a time. It works similarly in all other clock modes.
Dragging the mouse
Position the mouse pointer over the clock, press the left mouse button and drag. Dragging upwards will increase the value shown on the clock, dragging downwards will decrease the value shown on the clock. The step size is determined by which field of the clock you position the mouse over. If the clock is in Timecode mode and you begin dragging with the mouse pointer over the Seconds field, the clock value will increase or decrease by one second at a time. If you begin dragging with the mouse over the Hours field, the value will increase or decrease by one hour at a time. It works similarly in all other clock modes.
Controlling Playback
Controlling Playback
Ardour offers many ways to control playback of your session, including the transport bar, key bindings and remote controls. You can also use markers to define locations or ranges within the session and rapidly move around between them.
Note that if you synchronize Ardour with other devices then some or all of these control methods may not be available - depending on the synchronization protocol, Ardour may respond only to commands sent from the other device(s).
This chapter covers the following:
Looping the Transport
Looping the Transport
When the loop transport button is pressed, the playhead will jump the start of the loop range, and continue to the end of the loop range before returning to the start and repeating.
While looping, a light green area is displayed over the tracks to show the loop range.
Please see this section for more information on defining and altering the loop range.
Positioning the Playhead
The playhead is a vertical line with two arrows at each end that indicates the current position of playback.
Positioning the Playhead at the current pointer position
The command Editor/set-playhead (default binding: p) will set the playhead at the position of the pointer, if it is within the editor track area.
Positioning the Playhead on the timeline
An unmodified click anywhere on the timeline (rulers) will move the playhead to that position.
Positioning the Playhead with the transport clocks
Click on either the primary or secondary transport clock and edit the value to move the playhead to a specific position.
Positioning the Playhead at a marker
Context-click on the marker and select either Locate to here or Play from here.
Alternatively, position the pointer within the marker and press p to set the playhead at the marker.
Using Key Bindings
Ardour has many available commands for playback control that can be bound to keys. Many of them have default bindings, some do not, so the list below shows both the default bindings and command names.
- Space
- switch between playback and stop.
- Home
- Move playhead to session start marker
- End
- Move playhead to session end marker
- Right Arrow
- Left Arrow
- 0
- Move playhead to start of the timeline
Commands without default bindings include:
Using the Nudge Controls
Using the Nudge Controls
If there are no selected objects, the nudge controls can be used to move the playhead by a fixed amount backward or forward. The left and right buttons move either backward or forward in time, and the small clock to the left of these buttons sets the amount of time to nudge by. As with all other clocks, you can right-click on the clock to choose the time representation you want to use.
Note that this is a secondary purpose of the nudge controls - it is usually used to move selected objects by specific distances, rather than the playhead.
Using the Transport Bar
Using the Transport Bar
Working With Markers
Working With Markers
It is very useful to be able to tag different locations in a session for use when editing and mixing. Ardour supports both locations, which define specific single positions in time and ranges which define a start and end position in time.
There are also 3 special kinds of markers:
- CD markers
- locations that are restricted to legal CD track boundaries, and be used to add track marks/info to compact disc (CD) images.
- Loop range
- a range used to define transport loop start and end points.
- Punch range
- a range used to define start and/or end points for punch recording
This chapter covers the following:
Creating Location Markers
Creating Location Markers
You can create a location marker at any position in a session.
Create a location marker at the current position of the playhead
Create a location marker in a specific position on the timeline
Creating Range Markers
Creating Range Markers
Creating a Range on the timeline
Creating a Range in the Locations+Marks List
Getting To Know the Locations+Marks List
Getting To Know the Locations+Marks List
The Locations+Marks List is visible on a tab in the Editor Lists area. It can be used as a single point of control for all range and location markers (including the punch and loop ranges), or as a supplement to other methods of working with them.
First, there is the current loop and punch range; there are three clocks, being the start of the range, the end of the range and the length of the range. The start and end points have a ‘Use PH’ button beside them, which you can click to set the corresponding position using the current position of the playhead. Following this is a list of the session's markers, and finally there is a list of the range markers. At the bottom of the list are buttons to add new markers or ranges. The - button beside each marker and range allows that particular mark to be removed.
Moving Markers
To move a single marker
Click and drag it to a new location on the timeline.
To move multiple markers
Ctrl-click each marker you want to move, then drag one of the selected markers to a new location. All other selected markers will move with it, though bounded by the zero point on the timeline.
To move both ends of a range at once
drag one of the range markers (the start or end) and the other will in sync with it.
The Loop Range
The Loop Range
The loop range is a special range that defines the start and end points when loop-mode is enabled in the transport bar.
Defining the loop range on the timeline
Defining the loop range in the Locations+Marks list
The Marker Context Menu
The Marker Context Menu
Several operations on markers are available by right-clicking them to open the marker context menu. From this menu, you can:
- Locate to Here
- move the playhead to this marker's position.
- Play from Here
- start playback from this marker's position.
- Move Mark to Playhead
- move this marker to the current playhead position.
- Create Range to Next Marker
- create a range marker between this location and the next one along on the timeline.
- Hide
- hide this marker from the view. It can be re-shown from the Locations window
- Rename
- change the name of the marker.
- Lock
- if this is ticked, it will be impossible to drag the marker's position; useful if you want to prevent accidental movements.
- Glue to Bars and Beats
- if this is ticked, the marker will maintain its position in bars and beats even if there are changes in tempo and meter
- Remove
- removes the marker.
There are also a few options on the Active Mark submenu of the Transport menu. These options apply to the currently selected location marker, and move it to a nearby region boundary, region sync point, or to the playhead or mouse.
The Punch Range
The Punch Range
The punch range is a special range used to define where recording will start and/or stop during a punch.
Defining the punch range on the timeline
Defining the punch range in the Locations+Marks list
Working With Sessions
Working With Sessions
This chapter covers the following:
Backup and Sharing of Sessions
Backup and Sharing of Sessions
An Ardour session is stored in a single folder on your computer's filesystem. This makes backup very easy - any tool capable of backing up a folder (i.e. all of them) can be used to backup a session. You pick the location of a session when it is created - by default it will be in your default session location, which can be altered via Edit > Preferences > Misc > Session Management.
There is complication: a session may reference embedded media that are stored outside of the session folder. At this time (December 2012), there is no particularly good solution for this. Backing up a session with embedded files will not create a copy of the session containing those files.
The single folder approach also makes sharing a project easy. Simply copy the session folder (onto a storage device, or across a network) and another Ardour user (on any platform) will be able to use it. The limitation regarding embedded files applies to session sharing as well.
Interchange with other DAWs
Interchange with other DAWs
It has never been particularly easy to move sessions/projects created on one DAW to another. There are two "standards" that exist that have reasonably widespread support:
- OMF (Open Media Framwwork), also known as OMFI. Developed and controlled by Avid, never standardized
- AAF (Advanced Authoring Format). Developed by a consortium of media-related corporations.
but in practice both of these "standards" have such complex and/or incomplete specifications that different DAWs support them partially, differently or not at all.
Moving an Ardour session to another DAW
To move an Ardour session to another DAW, you have 3 basic choices:
- Stem exports
- Copy the interchange folder
- Use AATranslator
Moving another DAW session to Ardour
To move a session from another DAW to Ardour, you have 2 basic choices:
- Stem exports
- Use AATranslator
More details on these options are available:
Copying The Interchange Folder
Copying The Interchange Folder
All media in a session folder is stored in a sub-folder called "interchange". Below that is another folder with the name of the session. You can copy either of these to another location and use the files within them with any other application, importing them all into a project/session. You will lose all information about regions, tracks, and timeline positioning, but all the data that Ardour was working with will be present in the other DAW. Nothing below the "interchange" folder is specific to Ardour - any DAW or other audio/MIDI application should be able to handle the files without any issues.
Stem Exports
Stem Exports
Stem exports are covered fully in the Export chapter. A stem export creates 1 file per track, starting at the beginning of the session. You can then import each track into another DAW and begin working on it. You lose all data except the actual audio/MIDI (no plugins, no automation). This is one of the most common methods of interchange because it works between all DAWs.
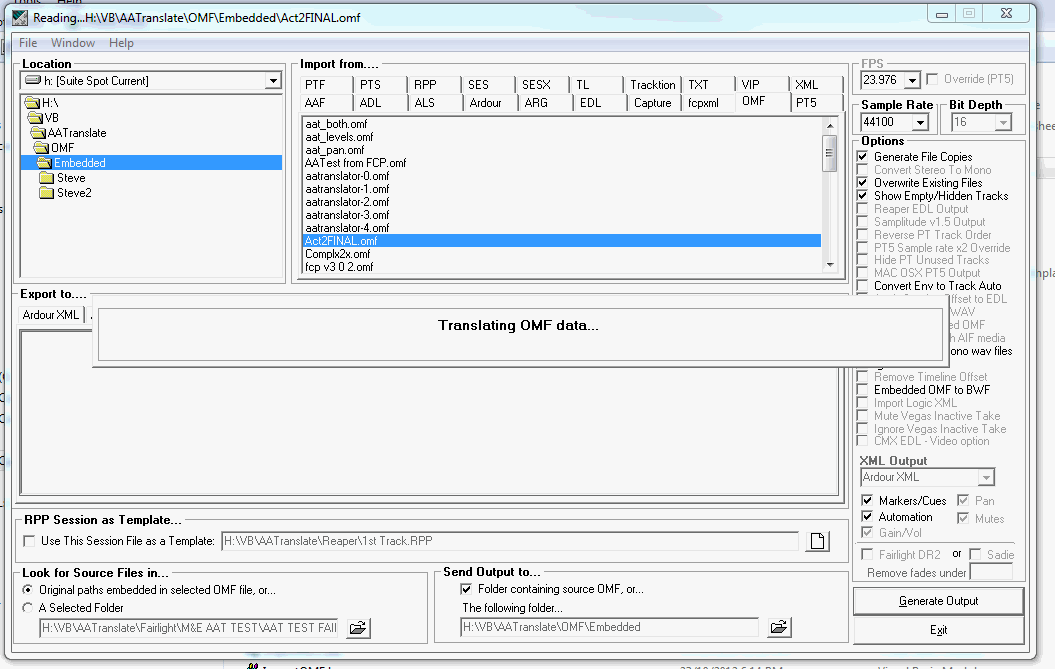
Using AATranslator
Using AATranslator
AATranslator is a Windows application that can convert sessions/projects from many diffferent DAWs into other formats. At the present time (December 2012), it can read and write Ardour 2.X sessions, and can read Ardour 3 sessions.
The program runs very well on Linux using Wine (a Windows environment for Linux). There are equivalent solutions for running Windows applications on OS X, but we have no experience with them at this time. Ardour users have reported great results using AATranslator on Ardour 2.X sessions.
The AATranslator website has full details on which formats/DAWs it supports, but they include ProTools, Live, Reaper, OMF, AAF and many more.
Renaming a Session
Renaming a Session
Use Session > Rename to give your session a new name. A dialog will appear to ask you for the new name.
This operation does not make a new session folder - the existing session folder and relevant contents are renamed. If your session was not saved before a rename operation, it will be saved automatically and then renaming will continue.
Ardour has no "Save As" operation that actually makes a new copy of the session folder and its contents.
Session Templates
Session Templates
Session templates are a way to store the setup of a session for future (re)use. They do not store any data but do store (for example):
- The number of tracks and busses, along with their names
- The plugins present on each track or bus (if any)
- All I/O connections
Creating a Session Template
Choose Session > Save Template. A dialog will appear to ask you for the name of the new template.
Using a Session Template
In the New Session dialog, choose the desired template from the combo selector.
Note that you can also use an existing session as a template, without saving it as one. This is available as an option in the New Session dialog. Doing this will not alter the existing session at all, but will use its track, bus and plugin configuration just like a template.
See also Track & Bus templates for information on templates for individual tracks or busses.
Snapshots
Snapshots
Sometimes you will want to save the current state of a session for possible use in the future. For example, you may be about to change the entire arrangement of a piece, or drastically alter the signal processing, and want a reference to come back to should that not work out.
This is easily accomplished using Session > Snapshot. A small dialog will appear allowing you to enter a name for the snapshot. The default name is based on the current date and time.
Creating a snapshot does not modify your session, nor does it save your session. Instead, it saves an "alternate" version of the session, within the session folder. The snapshot shares all data present in the session. You can create any number of snapshots.
After creating a snapshot, you can continue working on the session and save it normally using Session > Save and any existing snapshots will remain unchanged.
Switching to a Snapshot
If you are already working on a session and want to to switch to an existing snapshot, navigate the Snapshots tab of the Editor Lists. Find the name of the snapshot in the list and click it. Ardour will switch to the snapshot. If the session has not been saved, you will asked what you want to do.
Starting Ardour With A Snapshot
Since a snapshot is just another session file stored within the session folder, you can specify that "version" when loading an existing session. The browser in the "Open Session" dialog will show an expander arrow for sessions that have more than 1 session file (i.e. snapshots) present - click on it to see the list, and then click on the name of the snapshot you want to load.
Saving And Switching to a Snapshot
Sometimes you want to create a snapshot and then have all future edits and modifications saved to that snapshot rather than the main session. This is easily done using Session > Save As. This does not create a new session folder, but saves your session as a new snapshot and then switches the "current snapshot" to the newly created one. All subsequent saves of the session will be stored in this new snapshot, and existing snapshots (and the main session) will be left unaffected.
The New Session Dialog
The New Session Dialog
New Session Tab
In this tab you can type in the name of a session to create in the Name: field. You can also select a folder for this session to be created in, and if desired a template to create the new session as a copy of.
Under the Advanced Options, you can select specific behaviors that occur by default. This includes settings whether you wish to create a Master Bus, or a Control Bus, and how many channels you wish either to have.
You can also select whether you want Ardour to automatically connect all inputs to the physical ports of your hardware. If you select this Ardour will do so sequentially, to give an example, the first input of a track or bus will be connected to the first input of your hardware. The second input of a track or bus will be automatically connected to the second input of your hardware, and so on. When Ardour reaches the limits of your hardware, it will circle around and begin connecting with the first physical input of your hardware again. You can limit the number of channels on your physical hardware Ardour uses if you desire, and if that is the case, Ardour will only connect that many physical inputs to your tracks. Useful if you only want to connect the first input to do some voice over recording for instance.
Just like you can tell Ardour not to automatically connect track inputs, you can also modify how it automatically connects the outputs of the track or bus. By default Ardour will connect all tracks and busses to the Master Bus if there is one. However you can also tell it to automatically connect each output to the physical outputs of your interface or sound card, and like inputs can also limit the amount of physical outputs used, so for instance if you only have stereo monitors attached to the first two outputs of your sound card, you would not want Ardour to automatically connect to the next 6 that may be there with nothing attached to them.
Open Session Tab
The Open Session Tab will allow you to open an already existing session. You can also open any snapshot of a particular session by clicking on the arrow next to the session name to display all snapshots, and then selecting a snapshot. If a session is not displayed by default in the dialog you can click on the button next to "Browse" in order to bring up a file selection dialog to navigate your hard drive to find the file.
Audio Setup Tab
More details on this dialog/tab can be found below. Note that this tab is not visible if JACK is already running when the New Session dialog is displayed.
Audio Setup
Audio Setup
This is a tabbed-dialog within the New Session dialog that will appear only if JACK is not already running as you start Ardour. It provides a simple interface to configure JACK, which will then be started by Ardour. For more control and options regarding JACK, it is recommended that you start JACK before using Ardour, via a JACK control application such as qjackctl (sometimes called "Jack Control"), JackPilot, etc.
Device Tab
On this tab you can tell Ardour about the device it should use. The driver setting will tell it what driver to attempt to access.
- Driver
- On Mac OS X this will typically be CoreAudio. On Linux usually this will be either FFADO or ALSA, depending on whether or not you are utilizing a firewire device. Advanced users on all platforms may also use NetJack which provides network audio I/O
- Interface
- The selector should show all availiable interfaces that driver provides that are duplex capable for Ardour to use. Important if you are using an Intel Mac running OS X and the builtin audio interface, you must first merge its separate input and output devices into a single "aggregate device" before Ardour will be able to use it.
- Sample Rate
- The selector will allow you to select from any sample rate supported by the device selected above it.
- Buffer Size
- You can adjust the size of the buffer used by your audio interface to allow for either lower latency, or lower CPU usage and higher latency.
Options Tab
This tab has a few options that should be rarely used by most users. The Realtime Option allows Jack to run with Realtime privileges, which allows for smoother audio. The Verbose Output checkbox is primarily used for troubleshooting, it will cause Jack to use verbose messaging and output it to the console. The client timeout will help prevent clients from disconnecting from Jack if they don't respond to Jack fast enough. The number of ports changes the total number of ports that Jack will provide to all clients. And the server dropdown will allow you to change the path to the Jack executable to match where it is installed on your system.
Advanced Tab
The Advanced tab will allow you to set some advanced settings that are rarely needed. By default the input and output channels will automatically try to give you the amount of inputs and outputs as requested by the software, however some software doesn't always request as many as you need, this can provide more to software that can handle it.
Using More Than One Audio Device
Using More Than One Audio Device
Ardour will only use a single interface. If you want to use more than one interface you will need to lock them all to a sample clock, and then set up the device outside of Ardour.
Ardour is fundamentally designed to be a component in a pro-audio/music creation environment and standard operating practice for such setups involves using only a single digital sample "clock" (something counting off the time between audio samples). This means that trying to use multiple independent soundcards is problematic, because each soundcard has its own sample clock, running independently from the others. Over time, these different clocks drift out of sync with each other, and cause glitches in the audio. You can't stop this drift, although in some cases the effects may be insignificant enough that some people might not care about them.
Thus in an ideal world you should not use multiple independent soundcards but instead use a single device with a single clock and all the inputs, outputs and other features that you need.
Of course, a lot of people don't live in an ideal world, and believe that software should make up for this.
OS X
The precise instructions for creating an "aggregate device" on OS X have varied from one released to another.
- OS X 10.5
- Please read http://support.apple.com/kb/HT1215
- OS X 10.6 or later
- Please read http://support.apple.com/kb/HT3956
Aggregate devices also provide a method to use multiple soundcards as a single device. For example, you can "aggregate" 2 different 8-channel devices so that you can record 16 channels into Mixbus.
Linux
Please see the instructions at http://jackaudio.org/faq
What's In A Session?
What's In A Session?
The Session is the fundamental document type that is created and modified by the Ardour workstation. A "Session" is a folder on your computer filesystem that contains all the items that pertain to a particular project or "recording/editing/mixing session".
The Session folder includes these files and folders:
- The main session snapshot (session_name.ardour)
- Any additional snapshots (filenames ending in ardour)
- the auto-backup snapshot (session_name.ardour.bak)
- the undo history for the session (session_name.history)
- the instant file (instant.xml) which records the last-used zoom scale and other metadata
- a folder called "interchange" which holds your raw audio and MIDI files (whether imported or recorded)
- a folder called "export" which contains any files created by the "Export" function
- a folder called "peaks" which contains a waveform rendering of each raw audio file in the session
- a folder called "analysis" which contains transient and pitch information of each raw audio file
- a folder called "dead sounds" which contains sounds which Ardour has detected are no longer used in the session
A session combines some setup information (such as audio and MIDI routing, musical tempo & meter, timecode synchronization, etc.) with one or more Tracks and Buses, and all the Regions and Plug-Ins they contain.
Where are Sessions Stored?
Where are Sessions Stored?
Sessions are stored in a single folder on your computer's filesystem.
The first time you run Ardour, you will be asked where you would like the default location for sessions to be, with the initial choice being your home folder.
You can change it in that startup dialog, or later via Edit > Preferences > Misc > Session Management. You can also specify a particular (different) location for a session when creating it, in the New Session dialog.
Working WIth Regions
Working Witth Regions
Regions are the basic elements of editing and composing in Ardour. In most cases, a region represents a single contiguous section of one or more media files. Regions are defined by a fixed set of attributes:
- the source audio/MIDI file(s) they represent
- a starting point in the audio/MIDI file(s)
- a length
When placed into a playlist, they gain additional attributes:
- a position along the timeline
- a layer
There are other attributes as well, but they do not define the region. Things you should know about regions:
Regions are Cheap
By themselves, regions consume very little of your computer's resources. Each region requires a small amount of memory, and represents a rather small amount of CPU work if placed into an active track. So, don't worry about creating regions whenever you need to.
Regions are not files
Although a region can represent an entire audio file, they are never equivalent to an audio file. Most regions represent just parts of an audio file(s) on disk, and removing a region from a track has nothing to do with removing the audio file(s) from the disk (the Destroy operation, one of Ardour's few destructive operations, can affect this). Changing the length of a region has no effect on the audio file(s) on disk. Splitting and copying regions does not alter the audio file in anyway, nor does it create new audio files (only recording, and the Export , Bounce and Reverse operations create new audio files).
This chapter covers the following:
Region Naming
Region Naming
Regions are initially named using either:
- the name of the playlist for which they were recorded
- the name of the track for wich they were recorded
- the name of the embedded/imported file they represent
Whole File Region Names
These are not audio files, but regions that represent the full extent of an audio file. Every time a new recording is done, or a new file is embedded/imported, a new region is created that represents the entire audio file(s) This region will have the name of the track/playlist/original file, followed by a "-" and then a number plus a dot and then a number.
For recorded regions, the number will increase each time a new recording is made. So, for example, if there is a playlist called "Didgeridoo", the first recorded whole file region for that playlist will be called "Digderidoo-1". The next one will be "Digeridoo-2" and so on.
For imported/embedded files, the region name will be based on the file name, but with any final suffix (e.g. ".wav" or ".aiff") removed.
Normally, whole file regions are not inserted into tracks/playlists, but regions derived from them are. The whole-file versions live in the editor region list where they act as an organizing mechanism for regions that are derived from them.
Normal Region Names
When a region is inserted into a track/playlist, its initial name will end in a version number, such as ".1" or ".103". For a recorded region, if the whole file region was "Hang drum-1", then the region in the track will appear with the name "Hang drum-1.1". For an imported/embedded region, if the whole file region was "Bach:Invention3", then the region in the track will appear with the name "Bach:Invention3.1".
Copied Region Names
If the region is a copy of another region, it will begin life with the same name as the original. When an operation is carried out that modifies one of the copies, that particular copy will be renamed by incrementing the version number.
Renaming Regions
You can rename a region at any time. Use the region context menu to popup the rename dialog. The new name does not need to have a version number in it (in fact, it probably should not). The region will retain its name until it is modified after being copied.
Region Selection Equivalence
Track Groups have a property titled "Select" which, if enabled, will cause Ardour to try to propagate a region selection in one of a group's member tracks to the other members of the group..
For example, let's assume you have used multiple microphones to record a drum kit to multiple tracks. You have created a track group, added all the drum tracks, enabled the group and enabled the "Select" property for the group. When you select a region in one of the drum tracks, Ardour will select the corresponding track in every other drum track, which in turn means that a subsequent edit operation will affect all the selected regions (and thus all the drum tracks) together.
How Ardour decides which regions are "equivalent"
Regions in different tracks are considered to be equivalent for the purposes of sharing "selection" if they satisfy all the following criteria:
- Each region starts at the same offset within its source file
- Each region is located at the same position on the timeline
- Each region has the same length
Overlap Equivalence
Sometimes, the rules outlined above are too strict to get Ardour to do what you want. Regions may be slightly different lengths, or positioned slightly differently, and this will cause Ardour to not select regions in other grouped tracks that you would like it to.
In this case, enable Edit > Preferences > Editor > Use overlap equivalency for regions. With this option enabled, regions in different tracks will be considered equivalent for the purposes of selection if they overlap. This is much more flexible and will cover almost all of the cases that the fixed rules above might make cumbersome.
The Region Context Menu
In the editor window, context clicking on a region brings up a menu to provide access to many region operations. The menu begins with the name of the region, or "Selected Regions" if multiple regions are selected.
If there is more than 1 region layered at the point where you clicked, the menu will also contain an item "Choose Top" that if selected will show a dialog that allows you to adjust the layering of regions there. See Adjusting Region Layering for more details.
Below these items is the rest of the Track Context Menu, which provides access to track-level operations. To see the region context menu's contents, select the region name or "Selected Regions", and a submenu will appear with the following structure/contents:
- Play
- Loop
- Properties
- Rename
- Edit
-
- Combine
- Uncombine
- Split
- Make Mono Regions
- Opaque
- Mute
- Pitch Shift
- Reverse
- Close Gaps
- Place Transients
- Rhythm Ferret
- Strip Silence
- Position
-
- Move To Original Position
- Lock
- Glue to Bars and Beats
- Snap Position to Grid
- Set Sync Position
- Remove Sync
- Nudge Later
- Nudge Earlier
- Nudge Later by capture offset
- Nudge Earlier by capture offset
- Trim
-
- Trim Start at Edit Point
- Trim End at Edit Point
- Trim to Loop
- Trim to Punch
- Trim to Previous
- Trim to Next
- Layering
-
- Raise to Top
- Raise
- Lower
- Lower to Bottom
- Ranges
-
- Set Loop Range
- Set Punch Range
- Add Single Range Marker
- Add Range Marker per Region
- Set Range Selection
- Gain
-
- Normalize
- Boost
- Cut
- Reset Envelope
- Envelope Active
- Fades
-
- Fade In
- Fade Out
- Fades
- Duplicate
-
- Duplicate
- Multi-Duplicate
- Fill Track
- Export
- Bounce (without processing)
- Bounce (with processing)
- Spectral Analysis
- Remove
Working With Playlists
Working With Playlists
Playlists are a fundamental concept in Ardour that you may or may not end up using, depending on your workflow.
Playlist Operations
Playlist Operations
All operations on playlists start by clicking on the playlist button (labelled p) in a track header in the editor window. Clicking the button will popup a menu with the following choices:
- (Local Playlists)
- Shows all of the playlists associated with this track, and indicates the currently selected playlist
- Rename
- Pops up a dialog that allows the current playlist to be renamed
- New
- Creates a new empty playlist, and switches this track to use it
- New Copy
- Creates a new playlist that is a copy of the current playlist, and switches this track to use it
- Clear Current
- Removes all regions from the current playlist
- Select from All
- pops up a playlist browser to manually choose which playlist this track should use ( you can even select playlists from other tracks here)
Renaming Playlists
Playlists are created with the name of the track of which they are associated, plus a version number. So, the first playlist for a track called "Cowbell" will be called "Cowbell.1". This name will be used to define the names of any regions added to the playlist by recording. You can change the name at any time, to anything you want. Ardour does not require that your playlist names are all unique, but it will make your life easier if they are. Suggested examples of user-assigned names for a playlist might include "Lead Guitar, 2nd take", "vocals (quiet)", and "downbeat cuica". Notice how these might be different from the associated track names, which for these examples might be "Lead Guitar", "Vocals" and "Cuica". The playlist name provides more information because it is about a specific version of the material that may (or may not) end up in the final version of the track.
If you are going to rename your playlists, do so before recording new material to them.
Sharing Playlists
It is entirely possible to share playlists between tracks. The only slightly unusual thing you may notice when sharing is that edits to the playlist made in one track will magically appear in the other. If you think about this for a moment, its an obvious consequence of sharing. One application of this attribute is parrallel processing, described below.
You might not want this kind of behaviour, even though you still want two tracks to use the same (or substantially the same) playlist. To accomplish this, select the chosen playlist in the second track, and then use New Copy to generate an independent copy of it for that track. You can then edit this playlist without affecting the original.
Using Playlists for "Parallel Processing"
One of the uses of Playlists is to apply multiple effects to the same audio stream. For example, let's say you have a track and you'd like to apply a second set of effects, at the same time to the original track. In this case you could make a new track, select the original track's Playlist, and then apply different effects to the second track than the first (including panning, inserts, and bussing changes). Now, if you edit either of the track's playlists, the changes will appear in both tracks.
Using Playlists for "Takes"
Using Playlists for takes is a good solution if you are going to need the ability to edit individual takes, and select between them, but you won't be "compositing" multiple takes together. This might be the case if you were recording multiple languages of a given track, and you want to use the same "track" for each language so that they get the same processing. Then you select each language before exporting the mix for each separate language.
You use the Clear Current operation each time you want to start a new take. This is a non-destructive operation that removes all existing regions from the current playlist. Although you won't lose any information doing this, its probably not appropriate unless the last take was so awful that you want to discard it (although without the finality of Remove Last Capture ). Finally, and probably most useful, you can use the New operation in the playlist button menu to create a new empty playlist, ready for the next take. Later, you can Select your way back to previous or later takes as desired, either in this or some other track.
If you want to record multiple takes and then "comp" between them, it is probably better to simply record each successive take on top of the others in "layers" and then edit them using the layer tools, explained later.
Understanding Playlists
Understanding Playlists
A playlist is a list of regions ordered in time. It defines which parts of which source files should be played and when. Playlists are a fairly advanced topic, and can be safely ignored for many types of audio production, however the use of playlists allows the audio engineer more flexibility for tasks like multiple takes of a single instrument, alternate edits of a given recording, parallel effects such as reverb or compression, and other tasks.
Each audio track in Ardour is really just a mechanism for taking a playlist and generating the audio stream that it represents. As a result, editing a track really means modifying its playlist in some way. Since a playlist is a list of regions, most of the modifications involve manipulating regions: their position, length and so forth. This is covered in the chapter about regions. Here, we cover some of the things you can do with playlists as objects in their own right.
Tracks are not Playlists
It is important to understand that a track is not a playlist. A track has a playlist. A track is a mechanism for generating the audio stream represented by the playlist and passing it through a signal processing pathway. At any point in time, a track has a single playlist associated with it. When the track is used to record, that playlist will have one or more new regions added to it. When the track is used for playback, the contents of the playlist will be heard. You can change the playlist associated with a track at (almost) any time, and even share playlists between tracks.
If you have some experience of other DAWs, then you might have come across the term "virtual track", normally defined as a track that isn't actually playing or doing anything, but can be mapped/assigned to a "real track". This concept is functionally identical to Ardour's playlists. We just like to be little more clear about what is actually happening rather than mixing old and new terminology ("virtual" and "track") into confusing terminology.
Playlists are Cheap
One thing you should be clear about is that playlists are cheap. They don't cost anything in terms of CPU consumption, and they have very minimal efforts on memory use. Don't be afraid of generating new playlists whenever you want to. They are not equivalent to tracks, which require extra CPU time and significant memory space, or audio files, which use disk space, or to plugins that require extra CPU time. If a playlist is not in use, it occupies a small amount of memory, and nothing more.
Working with Tracks
Working with Tracks
This chapter covers the following:
Track Types
Data Type
An Ardour track can be either ‘audio’ or ‘MIDI’. The only real difference between the two is the type of data that the track will record and play back. Either type of track can pass either type of data. Hence, for example, one might have a MIDI track that contains an instrument plugin; such a track would record and playback MIDI data from disk but would produce audio, since the instrument would turn the one into the other.
Nevertheless, when adding tracks to a session, you typically have an idea of what you need to use the new tracks for, and Ardour offers you three choices:
- Audio Tracks
- an Audio Track is created with a user-specified number of inputs. The number of outputs is defined by the master bus channel count (see "Channel Configuration" below for more on this), This is the type of bus to use when planning to work with existing or newly recorded audio.
- MIDI Tracks
- A MIDI track is created with a single MIDI input, and a single MIDI output. This is the type of track to use when planning to record and playback MIDI, whether or not the MIDI will be processed by instrument plugins or sent to other applications or external MIDI hardware. If/when you add an instrument plugin, the output configuration of a MIDI track will be changed to have audio outputs to deliver the signal from the instrument to other parts of Ardour.
- Audio/MIDI Tracks
- There are a few notable plugins that can usefully accept both audio and MIDI data (Reaktor is one, and various "auto-tune" like plugins are another example. It can be tricky to configure this type of track manually, so Ardour allows you to select this track type specifically for use when working with such plugins. It is not generally the right choice when working normal MIDI tracks, and a dialog will warn you of this.
Track Modes
Audio tracks in Ardour can have a "mode" which affects how they behave when recording.
- Normal
- Tracks using this mode will record non-destructively - new data is written to new files, and when overdubbing, new regions will be layered on top of existing ones (with or without crossfades. This is the recommended mode for most workflows.
- Non-Layered
- Tracks using this mode will record non-destructively - new data is written to new files, but when overdubbing if new regions overlap existing regions, the existing regions are trimmed so that there are no overlaps. This can be a very useful way of working with spoken word material, especially in combination with push/pull trimming.
- Tape
- Tracks using this mode do destructive recording: all data is recorded to a single file and if you overdub a section of existing data, the existing data is destroyed (irrevocably - there is no undo). Fixed crossfades are added at every punch in and out point. This mode can be useful for certain kinds of dubbing workflows, but it not suggested for normal use.
Below is a screenshot that shows the subtly different results of an overdub in normal and non-layered mode. Both tracks were created using identical audio data. The upper track is in normal mode, and the overdub (the middle shorter region) has created a new region which if you look carefully has been layered on top of the the existing (longer) region. The lower track is in non-layered mode, and rather than overlay the overdub region, it split the existing region and inserted the new one in between.

Ardour tracks can have any number of inputs and any number of outputs, and the number of either can be changed at any time (subject to restrictions caused by any plugins in a track). However it is useful to not have to configure this sort of thing for the most common cases, and so the Add Tracks dialog allows you to select "Mono", "Stereo" and few other typical configurations.
What does Mono or Stereo actually mean?
Given that tracks have a certain number of inputs and a certain number of outputs and that these numbers may not necessarily be the same, it is not immediately clear what terms like "Mono" or "Stereo" mean. Most people will know that they refer to "1 channel" and "2 channels" in some way, but this leaves room for interpretation. 1 input channel? 2 output channels?
If you are using Ardour's default mode of automatically connecting track (and bus) inputs and outputs, then the designation "Mono" or "Stereo" refers to the input of the track. A Mono track will have a single input and a Stereo track will have two inputs.
The number of outputs for each will be determined by the number of inputs of the master bus, to which the track outputs will be connected. So in the most common case, using a 2 channel master bus, a Mono track has 1 input and 2 outputs that are connected to the master; a Stereo track has 2 inputs and 2 outputs that are connected to the master.
However, if you choose not to have Ardour make connections automatically, then tracks will be left disconnected by default. In this scenario, a Mono track has 1 input and 1 output, and a stereo track has 2 inputs and 2 outputs. It is up to you to connect them as you wish. This is not a particularly useful way to work unless you are doing something fairly unusual with signal routing and processing. It is almost always preferable to leave Ardour to make connections automatically, even if you later change them manually.
Adding Tracks
Adding and removing tracks
A track or bus can be added to a session in various ways:
- Choose Add Track or Bus… from the Track menu.
- Right-click in an empty part of the track controls area.
- Click the + button underneath the list of tracks in the mixer.
Any of these actions will open the Add Track or Bus dialogue,

From here, you can select firstly the number of tracks or busses to add, and the type; audio track, MIDI track or bus. There are also some options, which vary depending on the type of thing you are creating.
These options are:
- Configuration (for audio tracks and busses)
- this is the number of input and outputs the track is set up with. You can always change these counts later.
- Track mode (for audio tracks)
- this can be ‘normal’, ‘non-layered’ or ‘tape’.
- Group
- tracks and busses can be put into groups so that a selected range of operations are applied to all members of a group at the same time (selecting record enable, or editing, for example). This option allows you to specify an existing group to add the new track(s) or bus(ses) to, or to create a new group to put the new things in.
- Instrument (for MIDI tracks)
- this is a short-cut to allow you to create a MIDI track with an instrument plugin already added to it. You can achieve the same effect by creating a MIDI track with no plugins and adding it yourself; this option just makes things slightly quicker.
Adding tracks will add them to both the editor and mixer windows; the editor window shows the timeline, with any recorded data, and the mixer shows just the processing elements of the track (its plugins, fader and so on).
Tracks and busses can be removed by selecting them, right-clicking and choosing ‘Remove’ from the menu. A warning dialogue will pop up, as track removal cannot be undone; use this option with care!
Selecting Tracks
Region and Track Selection
By default, selecting regions has no impact on track selection. You can select a track, then select a region in another track (or vice versa) and both selections will co-exist happily. Operations that are applied to tracks will use the track selection, and those that apply to regions will use the region selection. Similarly,. deselecting a region will not deselect the track it is in (if that track was selected).
In some workflows, and particularly if you have experience of some other DAWs, this is not the most comfortable way to work. You may prefer to work in a style where selecting a region will also select the track that the region is in. Similarly, when the last selected region in a track is deselected, the track will also become unselected.
To control this behaviour, set Edit > Preferences > Editor > Link selection of regions and tracks.
Controlling Track Appearance
Ardour offers many options for controlling the specific appearance of tracks, including color, height, waveform style and more.
Global Options
These can all be found via Edit > Preferences > Editor
- Show meters on tracks in the editor
- By default, ardour will put meters in the track header in the editor window. Disable this option to avoid this.
- Show waveforms in regons
- By default, ardour will draw waveforms within audio regions. Disable this option to avoid this.
- Waveform scale
-
- Linear
- Logarithmic
- Waveform shape
-
- Traditional
- Waveforms are drawn as positive and negative heights above and below a "zero" line
- Rectified
- Waveforms are show as absolute heights above a "zero" line
Per-Track or per-group options are covered below:
Layering Display
Ardour allows arbitrary layering of regions - you can stack as you wish in a given position. By default, the editor windows draws them overlapping, which has the big benefit that is very economical in terms of using vertical space.
In this drawing mode however, working with a track that has many overdubs can sometimes be a little confusing because its not always entirely clear how the overdubs are all layered with respect to each other. Although there are other methods of moving particular regions to the top of an overlapping set, and although Ardour also has playlists to let you manage takes a bit more efficiently than just continually overdubbing, there are times when being able to clearly see all regions in a track without any overlaps is reassuring and potentially useful.
Here is an image of a track with a rather drastic overdub/overlap situation, viewed in normal "overlaid" mode:

To change this display, right click on the track header, and you'll see this menu:

You will see that there are two choices for "Layers": overlaid (currently selected) and stacked. Click on stacked and the track display changes to this:

You can still move regions around as usual, and in fact you can even drag them so that they overlay each again, but when you release the mouse button, things will flip back to them being all stacked cleaning. This display mode works best when you use sensible track heights. The number of "lanes" for the track is determined by the maximum number of regions existing in any one spot throughout the track, so if you have really stacked up 10 overdubs in one spot, you'll end up with 10 lanes. Obviously, using a large track height works much better for this than a small one.
Track Coloring
Track Color
New tracks in Ardour are assigned a random color from a somewhat pastel-like color spectrum, so they should never end up being particularly bright or particularly dark.
Changing the color of specific tracks
Select the tracks whose color you wish to change. Context-click on the track header of one of them. From the context menu, select "Color". A color dialog will appear. Choose the new color for the track, and click "OK" in the dialog. Every selected track will be recolored, both in the editor and mixer window.
Note that if you are only changing one track, context-clicking on that track's header will be enough to select it, saving the extra mouse click.
Changing the color of all tracks in a group
Tracks that belong to a track/bus group can share the color of the group by enabling the Color option for the group.
When this is enabled, you can change the color of the entire group by following the process described above for specific tracks - the new color will be used by all tracks in the group.
You can also explicitly change the group color by context-clicking on the group tab, selecting Edit Group... and then clicking on the Color selector in the dialog that is displayed. After you click "OK" in the color dialog that is provided for picking the color, all tracks in the group will be recolored to match the group color.
Track Height
Changing Track Height from the Header Context menu
Context clicking on the track header will select a track and display a conttext menu that includes the Height choice. Choose this, and a submenu will appear containg a number of preset heights. Choose one of them, and all selected tracks will be redrawn using that height.
Changing Track Height by dragging the track header
Select the tracks you wish to resize. Move the pointer to the bottom edge of the track header. The cursor will change to a 2-way vertical arrow shape. Left-click-drag to dynamically resize all selected tracks.
Making Track Heights fit the Editor Window
Select the tracks you wish to display in the Editor window. Choose Track > Height > Fit Selected Tracks (or use its shortcut, default is f). The tracks are resized and the editor track view is scrolled so that the selected tracks completely fill the vertical space available.
You can use Visual Undo (default bindng: Shift-z to undo this operation.
Controlling Track Ordering
Ardour does not impose any particular ordering of tracks and busses in either the editor or mixer windows. The default arrangement is as follows:
Editor default arrangement
- Master bus on top
- Tracks in the order they are added below, including busses
- Even if you use a Monitor section, it is never visible in the editor window.
Mixer default arrangement
- Tracks in the order they are added, from left to right
- Master bus on the right, in its own pane so that it is always visible no matter how other mixer strips are scrolled.
- If a Monitor section is used, that is at the right edge of the mixer window (it can be torn off, too)
Synchronizing Editor and Mixer Window Ordering
By default the ordering within the editor and mixer windows is synchronized: if you reorder in one window, the ordering in the other window will change. You can disable this via Edit > Preferences > Editor > Synchronize Editor and Mixer Track Order. When disabled, the ordering both both windows is totally indepedent of the other.
Reordering Specific Tracks...
... in the Editor Window, via the Keyboard
Select the tracks you want to move. Then use Track > Move Selected Tracks Up (↑) or Track > Move Selected Tracks Down (↓) to move the selected track(s) up or down in the editor window.
... in the Editor Window, via Drag-n-Drop
Make the Editor Lists visible. Select the Tracks & Busses tab. In the browser there, you can freely drag-and-drop tracks and busses into any order you prefer.
... in the Editor Window, via Drag-n-Drop
Within the "Strips" browser in the upper left area of the Mixer window, you can freely drag-and-drop tracks and busses into any order you prefer.
"Collecting" Group Members together
Tracks and Busses that are members of a group can be reordered so that they display contiguously within the Editor and Mixer windows. Context-click on the group tab and choose "Collect".
Track Ordering and Remote Control IDs
Every track and bus in Ardour is assigned a remote control ID. When various protocols such as Mackie Control or OSC are used to control Ardour, these remote control IDs are used to identify which track(s) or buss(es) are the intended target of the commands.
By default, remote ID's will be assigned to tracks and busses in the order that they are created, starting from 1. The master bus and monitor section have their own unique IDs (318 and 319).
Ardour provides 3 methods to control remote control IDs, which can be chosen via Edit > Preferences > User Interaction:
- Follow order of editor
- When enabled, remote control IDs will be reset to match the editor window order, so that the leftmost track/bus has RID 1. Manual assignment of RIDs is not possible.
- Follow order of mixer
- When enabled, remote control IDs will be reset to match the mixer window order, so that the leftmost track/bus has RID 1. Manual assignment of RIDs is not possible.
- Assigned by user
- When enabled, the remote control ID is completely independent of the ordering in either window, and RID's may be changed manually by the user.
Bus Controls
A typical control area for a bus is shown below:

At the top-left of the controls is the name of the bus. This can be edited directly to whatever is suitable, although the name must be unique within the session. Underneath the name is a copy of the bus' main level fader. The control buttons to the right-hand side are:
- m
- mute. left-click to mute the bus. Right-click to display a menu which dictates what particular parts of the bus should be muted.
- s
- solo — solo the bus. The behaviour of the solo system is described in detail in the section called “Mute and solo”.
- a
- automation — click to open a menu related to automation for the bus. Automation is covered in Chapter 9, Automation.
- g
- group — click to open a menu related to the bus group, as discussed in the section called “Track and bus groups” above.
Audio Track Controls
A typical control area for an audio track is shown below:

An audio track has the same controls as a bus, with the addition of two extras. The red button with the pink circle is the track's record enable. When this is clicked it will gain a bright red outline, and the track will then be recorded onto when the main session record enable is turned on with the transport rolling.
The ‘p’ button below the record enable will open a playlist menu when clicked. The menu offers various operations related to the track's playlist. This, as you will recall, is simply a list of the regions that the track should play. Playlists may be swapped on a given track, and may be used by more than one track at the same time. They are often useful to keep different takes, for example, or to allow one set of regions to be played off two tracks with different processing.
MIDI Track Controls
A typical control area for a MIDI track is shown below:

The MIDI track example is shown at a greater height than the other examples, as with MIDI tracks there are some control elements which only appear when there is sufficient vertical space to fit them in.
A MIDI track has the same basic controls as an audio track, with the addition of two extra elements. The set of buttons below the main track controls controls the MIDI channels that should be visible in the editor. A MIDI track's data may span any number of the 16 available MIDI channels, and sometimes it is useful to view only a subset of those channels; different instruments may, for example, be put on different MIDI channels. Clicking on a channel number toggles its visibility.
To the right of the MIDI track controls is a representation of a piano keyboard called the ‘scroomer’. This performs a couple of functions. Firstly, the scroll-bar controls the range of pitches that are visible on the track. Dragging the scroll-bar body up and down scrolls up and down through the visible pitches, and dragging the scroll-bar ‘handles’ zooms in and out, so that more or fewer pitches are visible. The piano keyboard gives a reference for the pitches that the track is displaying. In addition, clicking on the notes will generate the corresponding MIDI note in the track.
The Track Context Menu
Within the editor window, context-clicking on either a region or empty space within a track will popup the track context menu, which provides easy access to many track-level operations.
If you click on a region, the first item in the menu will the name of the region. If there are more than one regions stacked where you clicked, this will be followed by an item called Choose Top. If selected, you will see a dialog that allows you to reorder the stacking of layers at that point. See Adjusting Region Layering for more details.
The rest of the track context menu is structured as follows:
- Play
-
- Play from Edit Point
- Play from the location of the current edit point.
- Play from Start
- Play from the start of the session
- Play Region(s)
- Plays the duration of the session from the start of the earliest selected region to the end of the latest selected region
- Select
-
- Select All in Track
- Select All
- Invert Selection in Track
- Invert Selection
- Set Range to Loop Range
- Set Range to Punch Range
- Select All After Edit Point
- Select All Before Edit Point
- Select All After Playhead
- Select All Before Playhead
- Select All Between Playhead and Edit Point
- Select All Within Playhead and Edit Point
- Select Range Between Playhead and Edit Point
- Edit
-
- Cut
- Copy
- Paste
- Align
- Align Relative
- Insert Selected Region
- Insert Existing Media
- Nudge
-
- Nudge Entire Track Later
- Nudge Track After Edit Point Later
- Nudge Entire Track Earlier
- Nudge Track After Edit Point Earlier
- Freeze
Track and Bus Groups
Tracks and busses can be put into groups. The members of a group can be set to share various settings, which can be useful for managing tracks which are closely related to each other. Examples might include tracks that contain multiple-microphone recordings of a single source (an acoustic guitar, perhaps, or a drum-kit).
You can put tracks and busses into groups in various ways. In the editor window, a track's controls might look like these:

The green tab to the left of the track header indicates that this track is in a group called ‘Fred’. These tabs can be dragged in the editor window to add to or remove tracks from groups.
Creating New Groups
There are several ways to create track/bus groups:
Context-click on the group tab and use one of the "Create..." options there. You can create a group with no members, or one that starts with the currently selected tracks, or record-enabled tracks, or soloed tracks as it members.
Alternatively, clicking the ‘g’ button on a track header opens a menu which gives a list of the available groups; selecting one of these groups will add the track or bus to that group. This menu also allows a new group to be created.
Finally, the Groups tab of the Editor Lists or the Mixer Window has a "+" button at the bottom of the list that can be clicked upon to create a new group.
Removing Groups
Context-click on a group tab and select Remove Group from the menu. Removing a group does not remove the members of a group.
You can also remove groups by selecting them in the Groups tab of the Editor Lists or Mixer Window and then pressing the "-" button at the bottom of the list.
Adding/Removing Tracks and Busses to a Group
Clicking the ‘g’ button opens a menu which gives a list of the available groups; selecting one of these groups will add the track or bus to that group. Selecting "No Group" will remove it.
You can also drag a group tab to add or remove tracks from the group.
Activating/Deactivating Groups via the group tab
Clicking on a group tab will toggle the group between being active and inactive. An inactive group will have no effect when editing its members. An active group will share 1 or more properties across its members. Tabs for disabled groups are coloured grey.
Modifying Group Properties
The properties of a group can be edited by right-clicking on its tab and choosing Edit Group…. This will open the track/bus group dialogue, which is also used when creating new groups:

Group Color
Clicking on the color selector button allows the group's colour can be changed. This affects the colour of the group's tab in the editor and mixer windows. The color does not affect the color of the group members unless you also enable the shared Color property.
Following these options are a list of the things that the members of the group can share.
Shared Properties
Gain means that the track faders will be synced to always have the same value; ‘Relative’ means that the gain changes are applied relative to each member's current value. If, for example, there are two tracks in a group with relative gain sharing, and their faders are set to -3dB and -1dB, a change of the first track to a gain of -6dB will result in the second track having a gain of -4dB (so that the difference in gains is the same).
Muting, soloing, record enable, route active state, colour and monitoring are all straightforward; they simply mean that all member tracks or busses will share the same settings in these respects. See Working With Tracks for more on these properties.
Selection means that if a region is selected or deselected on one constituent track, corresponding regions on other member tracks will be similarly selected. Corresponding regions are those that are at the same position and have the same length. Since region editing operations are applied to all currently selected regions, this is the way to make edits apply across all tracks in the group.
Group Tab Context Menu
Context-clicking on the group tab offers a further menu of group-related actions.
- Create a New Group
- create a new group
- Create New Group from...
- create a new group and automatically add ...
- Selected
- all currently selected tracks and busses
- Rec-enabled
- all currently record-enabled tracks
- Soloed
- all currently soloed tracks and busses
- Collect Group
- moves all the member tracks so that they are together in the editor window
- Remove Group
- removes the group (and only the group, not its members).
- Add New Subgroup Bus
- creates a bus (giving it the name of the group) and connects the output of each member to the new bus.
- Add New Aux Bus
- adds a bus and gives each member a send to that bus. There are two options for this, specifying whether the sends should be placed pre- or post-fader.
- Fit to Window
- will zoom the member tracks so that they fill the editor window.
- Enable All Groups
- makes all group active, including any hidden groups.
- Disable All Groups
- makes all groups inactive, including any hidden groups.
Working with Plugins
Plugins are bits of software that get loaded by Ardour in order to:
- Create various audio or MIDI effects
- Generate audio by functioning as "software instruments"
Plugins are written by 3rd parties, and Ardour supports a variety of different plugin standards:
- LADSPA
- An early, simple, lightweight plugin API, audio effects only, plugins have no editors/GUI of their own
- LV2
- An extensible, full-featured plugin API, audio and MIDI, plugins can provide their own editors/GUIs
- AudioUnit
- OS X only, full featured, audio and MIDI, plugins can provide their own GUI
- Linux VST
- Plugins using Steinberg's VST plugin standard but compiled specifically for Linux
- Windows VST
- Plugins using Steinberg's VST plugin standard but compiled for Windows. Support for this plugin format is not available in regular builds of Ardour. Read more...
Adding/Removing/Copying Plugins
Within Ardour, plugins are just another type of Processor and so the techniques for adding/removing/copying/moving processors apply to plugins as well. These techniques are covered on the Processor Box page.
Managing Plugin Presets
All plugin editors, whether they are created by Ardour or by the plugin, have a common set of controls at the top of their window. These include 4 controls for managing plugin presets.
What is a Plugin preset?
A preset for a plugin is simply a saved set of values for all of a plugin's parameters. If you load a preset, you are restoring all the parameters within that plugin to the values stored in the preset. This is an easy, fast way to manage your preferred settings for particular plugins.
The Preset Selector
The preset selector is a regular selector that can be clicked to display a list of all known presets for this plugin. This will include presets that you have created yourself, and for some plugin formats, presets that come with the plugin itself.
To load a new preset
Click on the preset selector to popup a menu showing the names of all available presets. Click on the name of the preset you wish to load. The preset will be loaded - you may see various controls in the plugin editor change to reflect the new value of some or all parameters.
Creating Presets
To save the current plugin settings as a new preset, click on the "Add" button at the top of the window. A dialog will appear to ask for the name of the preset. Enter the desired name, and then click the "OK" button in the dialog. The preset selector will now show the name you have just entered.
Saving a Preset
If you wish to modify the settings in an existing preset, use the preset selector to load the preset. Then adjust the settings as you wish. When done, click the "Save" button and the new values will be stored, overwriting the previous version of this preset.
To delete a preset
To delete an existing preset, use the preset selector to load the preset. Click the "Delete" button, and the preset will be removed. The preset selector will be blank, showing that no preset is currently loaded (although the settings will stay as they were).
The Plugin Manager
The Processor Box
A ‘processor’ is a thing which treats the signal in some way. Ardour provides several builtin processors, such as the "fader" processor which controls the gain (volume) of a track or bus. Processors can also be plugins used for effects or as instruments, as well as sends/inserts which are used to change signal routing. The arrangement of processors is arbitrary, and there is no limit to how many there can be.
The main box in the top half of a mixer strip shows the processor list. Processors are shown as coloured rectangles, with a small ‘LED’ beside them; this indicates whether or not the plugin is enabled, and can be clicked to enable or disable a processor. The colour of the processor depends on its location in the sequence; processors that occur before the fader are coloured in red, and those after are coloured green (in the default theme).
The processor box will always contain a blue processor called ‘Fader’. This indicates where in the processor chain the main volume fader is located — this is the fader shown in the lower half of the strip.
To Reorder (Move) Processors
Processors can be re-ordered using drag-and-drop. Dragging a processor allows it to be moved around within the chain, or copied to another processor list on another track or bus.
To Enable/Disable a Processor
To the left of the name of each processor is a small LED symbol; if this is lit-up, the processor is active. Clicking on it will deactivate the processor. It will still pass audio or MIDI signals, but they will not be affected.
Adding Processors
Finally, processors can be added to or removed from the chain. Right-clicking the processor list does three things:
- A gap is opened up to indicate the location of the click. The gap shows where any new processors will be inserted.
- The processor under the click is selected.
- A menu is presented giving options of what to do.
From the menu, some new processors can be inserted.
Removing Processors
Context-click on the processor you want to remove.
Windows VST Support
Thanks to the combined work of Torben Hohn, Kjetil Mattheusen, Paul Davis and a few other developers, it is possible to use Windows VST plugins (that is, plugins in VST format built and distributed for the Windows platforms) on Ardour running on Linux. (Note: there is no VST support of any kind on OS X).
However, doing so has three substantial downsides:
- It requires a special build of Ardour that is fundamentally very different from normal builds.
- Support is reliant on Wine, a Windows "emulator".
- As usual with plugins, crashes in the plugin will crash Ardour. And crashes in Windows VST plugins are more likely when used in this way.
The dependence on Wine makes it almost impossible for the Ardour project to support this feature. Wine's functionality generally improves over time, but any given release of Wine may behave worse with some or all Windows VST plugins. It may even just crash Ardour completely.
Step back and think about what "using Windows VSTs" really means: taking bits of software written with only one idea in mind - running on the Windows platform - and then trying to use them on an entirely different platform. It is a bit of a miracle (largely thanks to the incredible work done by the Wine project) that it works at all. But is this the basis of a stable, reliable DAW for a non-Windows platform? Getting Ardour on Linux to pretend that its really a Windows application running on Windows?
We understand that there are many outstanding plugins available as Windows VSTs and that in many cases, no equivalent is available for Ardour's Linux-based users. If your workflow is so dependent on those plugins, then remain on Windows (or potentially consider using an actual Windows VST host running inside of Wine). If you can make the effort, you will get a better environment by using a normal build of Ardour and exploring the world of plugins built to run on Linux natively. This covers LADSPA, LV2 and Linux VST formats, and even some outstanding proprietary plugins such as those from LinuxDSP and Loomer.
Working with Ardour-built Plugin Editors
If a plugins does not have its own editor/GUI, Ardour will construct one from a small set of common control elements. Ardour will do this even for plugins that have their own, if you disable Edit > Preferences > GUI > Use Plugins' own interface instead of Ardour's
To view a plugin editor, double-click on the plugin within the processor box. A new window will appear showing the editor/GUI for the plugin.
Adjusting parameter sliders
Resetting a value to its default
Shift-click on the controller.
Automation Controls
Adding Pre-existing Material
Adding Pre-existing Material
Many sessions will involve the use of pre-existing material, whether it consists of audio and/or MIDI data. Using existing samples, loops and riffs from files stored on your system can be the basis for a new session, or a way to deepen and improve one that is already underway.
There are four pathways for importing/embedding an audio or MIDI file into a session.
Session > ImportRegion List context menu > Import To Region ListTrack context menu > Import Existing Media
These methods are all equivalent: they open the "Add Existing Media" import dialog. Once the dialog is open, you can choose to add new audio as new tracks, as regions in the region list, or as audio in the selected track. You can change this behavior once the dialog is opened.
Finally, you can also easily import files into your project by dragging and dropping the file from some other application (e.g. your platform's file manager such as Nautilus or Finder). You can drag onto the Region List or into the desired track or into empty space in the editor track display. The file will be imported (copied) into your session, and positioned at the mouse pointer position when the drag ended.
This chapter covers the following:
Importing versus Embedding
Importing versus Embedding
Importing and embedding are two different methods of using existing audio files on your computer (or network file system) within a session. They differ in one key aspect:
Importing
An existing media file is copied to the session's audio folder, and if necessary is converted into the session's native format.
For audio files, you can control the choice of this format (eg. WAVE or Broadcast WAVE). Audio files will also be converted to the session sample rate if necessary, which can take several minutes for larger files.
MIDI files will already be in SMF format, and are simply copied into the session's MIDI folder.
Embedding
An existing media file is used as a the source for a region, but is not copied or modified in any way.
You can choose to import or embed the files in your session selecting or de-selecting the "Copy file to session" option in the Import dialog window.
 the file will be imported in the audio/MIDI folder of your session
 the file won't be copied.
If it doesn't work you can uncheck Preferences > Misc > Session Management > Always copy imported files.
Searching and Importing From Freesound
Searching and Importing From Freesound
http://www.freesound.org is an online repository of searchable sound files. The “Search Freesound” of the Import dialog tab allows you to search the Freesound database, download & audition files from within the Import dialog.
Tags: enter the “tags” that you would like to search. You may enter multiple search terms separated by spaces. For example “drums 120bpm” will search for files that are tagged “drums” OR “120bpm”.
Sort: Choosing one of the sort options will cause Freesound to order the files before returning the list of available files. This can save time if you know (for example) the sound you need is very short.
Search: Click this button to initiate the search. Freesound will begin returning pages of information, with 20 items per page. You may click “Stop” to stop downloading.
The file list: Click on a file to download it from Freesound. Double-click the file to auto-play it in the auditioner.
Files imported with Freesound will automatically include any Tags that are associated with the file, and these tages will be included in a search when you use the “Search Tags” tab.
Searching for Files Using Tags
Searching for Files Using Tags
A "tag" is bit of information, or metadata, that is associated with a data file. Specifically, tags are keywords or terms that you feel have some relevance to a particular soundfile. Ardour can store these tags in a searchable database so that you can quickly search for sounds based on the tags that you have assigned to them. For example you can assign the term "120bpm" to a sound, and then when you search for this tag, the file will appear in the search list. Tags are independent of the filename or anything else about the file. Tags, and the file paths that they are associated with, are stored in a file called "sfdb" in your Ardour user folder.
How To Add Tags To a File
How To Add Tags To a File
The process is quite easy:
- Show the Import dialog
- Select the file in the Import dialog's file browser
- Type in new/extra tags in the Tags section of the Soundfile Information box

Tags are stored when the input box loses focus, there is no reason to explicitly "save" them.
Searching With Tags
Searching With Tags
- Show the Import dialog
- Select the "Search Tags" tab of the Import dialog
- Enter the tag(s) you want to search for and press "Search"

Files which have been "tagged" with the input terms will appear in the results window. You can audition these files and apply tags to them from this window.
Supported File Formats
Supported File Formats
The list of audio file formats that Ardour can import/embed is quite long. It is based on the functionality offered by libsndfile, an excellent and widely used software library by Australian programmer Erik de Castro Lopo. As libsndfile's capabilities expand, so will Ardour's abilities to import (and export) new formats. Ardour supports all common audio file formats, including WAV, AIFF, AIFC, CAF, W64 and BWF. with all typical sample formats (8,16,24,32 bit integer, floating point, and more).
You can find a full list of libsndfile's supported formats here.
For MIDI import, Ardour will read any Standard MIDI Format (SMF) file.
The Import Dialog
The Import Dialog

The Soundfile Information Box
Previewing Files Before Import
Importing Files as Tracks or Regions
Importing versus Embedding
Recording
Recording
This chapter covers the following:
Monitoring
An Introduction to Monitoring
When recording, it is important to hear yourself, and to hear any pre-recorded tracks that you are performing with.
Audio recorders typically have the ability to "monitor" (i.e. listen to) the tracks that are armed for recording, while playing back the tracks that aren't. In the days of analog tape recording, this was performed with relays and other analog audio switching devices. Digital recorders have the same feature, but may impart some "latency" (delay) between the time you make a noise and the time that you hear it come back from the recorder.
The latency of any conversion from analog to digital and back to analog is about 1.5-2 milliseconds. Despite common listening conditions creating 3 millisecond delays, some musicians claim that even the basic A/D/A conversion time is objectionable. However it is commonly believed that a latency below 5 milliseconds is suitable for a professional recording setup. Because 2 milliseconds have already been used in the A/D/A process, you must use extremely low "buffer sizes" in your workstation I/O setup to keep the overall latency below 5ms. Not all computer audio systems are able to work reliably at such low buffer sizes.
For this reason it is sometimes best to use an external device to monitor yourself while recording to digital medium. Many professional studios use a mixing console for this feature. Many computer I/O devices have an "monitoring" function built-in (although this is typically only for 1 or 2 channels). In either case, the monitoring hardware may be digital or analog. And in the digital case you will still have the A-D-A conversion latency of 1-2ms.
Different ways of monitoring
There are three basic ways in which monitoring may be approached:
External Monitoring
With this approach, Ardour plays no role in monitoring at all. Perhaps the recording set-up has an external mixer which can be used to set up monitor mixes, or perhaps the sound-card being used has some ‘listen to the input’-style feature. This approach often has the advantage of zero or near-zero latency. On the other hand it requires external hardware, and the monitoring settings are not saved with the session.

JACK-based hardware Monitoring
Some sound cards have the ability to mix signals from their inputs to their outputs with zero- or low-latency. Furthermore, on some cards these features can be controlled by JACK. This is a nice arrangement, if the sound card supports it, as it combines the convenience of having the monitoring controlled by Ardour with the low latency operation of doing it externally.

Software Monitoring
With this approach all monitoring is performed by Ardour; it makes track inputs available at track outputs, under the influence of various controls. This approach will almost always have more routing flexibility than JACK-based monitoring. The disadvantage is that there will be a latency between the input and the output which will depend mainly on the JACK buffer size that is being used.

Setting up Monitoring
There are three main settings which affect how monitoring is performed. The first is Edit > Preferences > Audio > Record monitoring handled by. There are two or three options here, depending on the capabilities of your hardware:
The other two settings are more complex; one is ‘Tape machine mode’, in the same dialogue, and the other is ‘Monitoring automatically follows transport state (‘auto-input’)’ setting in Session Properties.
Monitoring is also somewhat dependent on the state of the track's record-enable button, the session record enable button, and whether or not the transport is rolling.
Monitoring in software or hardware monitoring modes
If Ardour is set to ‘external monitoring’, the explanation of Ardour's monitoring behaviour is simple: it does not do any. In the other two modes, things are more complex.
Monitoring in non-tape-machine mode
This section describes what happens when Ardour is not set to tape-machine mode.
Consider first the case when a track is record-enabled. In this situation, it will always monitor the live input unless the session is not record-enabled, auto-input is enabled, and the transport is rolling.
When a track is not record-enabled, the track will play back its contents from disc unless the transport is stopped and auto-input is enabled. In this case, the track monitors its live input.
Monitoring in tape-machine mode
In tape-machine mode, things are slightly simpler; when a track is record-enabled, its behaviour is the same as in non-tape-machine mode: it will always monitor the live input unless the session is not record-enabled, auto-input is enabled, and the transport is rolling.
When a track is not record-enabled, however, the track will always just play back its contents from disk; the live input will never be monitored.
Track Recording Modes
"Recording mode" is a per-track property (audio tracks only) that affects the way that recording new material on top of existing material ("overdubbing") operates in that track. Ardour offers 3 different recording modes:
- Normal
- overdubs write to new files, new regions are layered on top of existing regions (with or without crossfades)
- Tape mode
- overdubs destructively write to an existing file, single region per track (fixed crossfades at every punch)
- Non-Layered mode
- overdubs write to new audio files, new regions are created but if they overlap with existing regions, the existing regions are trimmed so that there no overlaps
To change the recording mode of a track, right click on its track header to get the context menu:

Below is a screenshot that shows the subtly different results of an overdub in normal and non-layered mode. Both tracks were created using identical audio data.
The upper track is in normal mode, and the overdub (the middle shorter region, selected) has created a new region which if you look carefully has been layered on top of the the existing (longer) region.
The lower track is in non-layered mode, and rather than overlay the overdub region, it split the existing region and inserted the new one in between.
Non-layered mode is extremely useful when combined with push/pull trimming.
Signal Routing
The default connections created by Ardour are as follows:
- Track inputs are connected to hardware inputs, in round robin order (explained here in more detail).
- Bus inputs are left disconnected
- Track and bus outputs are configured based on the channel count of the master bus
- Track and bus outputs are connected to the master bus inputs
- Master bus outputs are connected to hardware outputs
this configuration is sufficient to do basic tracking and playback of many sessions without any adjustment by the user. If you are using Ardour and start to change these connections, be certain that you have a good reason to do so - it is generally not necessary and often leads to problems.
However, for many workflows during mixing, more complicated signal routing is required. Ardour offers many possibilties for connecting things in the way you may need or want them.
Aux Sends
What is an Aux
Using auxes involves two distinct components of Ardour's mixer. One is an aux bus, which is just a normal Ardour bus that has no inputs arriving from the outside world. The other is an aux send, which is a secondary signal routing out of a track (or bus) that delivers the signal it receives to a separate aux bus. The output of the aux bus may be delivered to entirely separate hardware outputs (e.g. for headphone or monitor wedge mixes), or returned to the main mix after some common FX are applied to the signal on the bus.
Common uses for aux sends include:
- Applying real time FX (either with plugins or external FX) to a submix
- Creating headphone or monitor wedge mixes for performers to listen to
- Consolidating volume control of a submix under a single fader (though there are other ways to do this)
It may be useful to compare and contrast the use of aux sends with subgrouping.
Adding a new aux bus
Choose Session > Add New Track or Bus. In the New Track & Bus dialog, select "Busses" in the Track/Bus selector at the upper right.
Adding a send to an aux bus
Context-click on the processor box for the track you want to send to the bus, and choose New Aux Send. From the submenu, choose the bus you want to send to. A send will be added (and will be visible in the processor box). Note that the submenu may be empty if there are no aux busses.
Pre-fader and Post-fader Aux Sends
Depending on whether you context-click above or below the fader in the processor box, the new aux send can be placed before or after the fader in the channel strip. Post-fader aux sends are typically used when using an aux for shared signal processing (FX), so that the adjusting the main fader on a channel alters how much signal goes to the FX bus. Aux sends are placed pre-fader so that the level sent to the bus is controlled only by the send, not the main fader - this is typical when constructing headphone/monitor wedge mixes.
Adding a new aux bus and sending a Track Group to it
You can add aux sends to all members of a group and connect them to a new aux bus with a single click. After creating the track group (and adding tracks to it), context-click on the group tab and choose either Add New Aux Bus (pre-fader) or Add New Aux Bus (post-fader). A new aux bus will be created, and a new aux send added to every member of the track group that connects to the new aux bus.
Altering Send Levels
You can alter the amount of the signal received by a send that it delivers to the bus it connects to. There are two approaches to this:
Use the Send Fader
Every send has a small horizontal fader that can be adjusted in the usual way. It is not very big and so this can be a little unsatisfactory if you want very fine control over the send level.
Mapping the Main Fader
Double-clicking on the send in the processor box will allow you to use the "big" fader of the mixer strip to control the send. The visual appearance of the mixer strip will change to reflect this. Double-click the send again to revert back to normal function for the strip.
Map Aux Sends To Main Faders
Pressing the button marked "Aux Sends" on a aux bus will alter the channel strip for every track/bus that feeds the aux bus. Many aspects of the strip will become insensitive and/or change their visual appearance. More importantly, the main fader of the affected channel strips will now control the send level and not the track gain. This gives a larger, more configurable control to alter the level. Click the "Aux Sends" button of the aux bus again to revert the channel strips to their normal use.
Bypassing Sends
Clicking on the small "led" in the send display in the processor box of the channel strip will enable/disable the send. When disabled, only silence will be delivered by this track to the aux bus. When enabled, the signal arriving at the send will be delivered to the aux bus.
Send Panning
In the current version of Ardour, sends share the same panning as the main outs of a track. This is scheduled to change in the future.
Comparing Aux Sends and Subgroups
Auxes and Subgroups do share a common concept - they both provide a way for 1 or more tracks (or busses) to send their signal to a single bus so that common signal processing can be applied to the mix of their signals.
An aux send leaves the existing signal routing to the main mix inplace, and is typically used to create a separate mix to send to (for example) monitors or headphones (for performer monitor mixes).
Subgroups remove the original signal routing to the main mix, but create a new one that delivers the output of the subgroup bus to the main mix instead.
The following two diagrams compares the signal flow when using subgroups and when using aux sends:
Subgroup signal routing

Aux send signal routing

External Sends
An external send is a way to send the signal from within a channel strip to an external application or piece of hardware. By itself, an external send has no effect whatsoever on the audio signals within Ardour - it is a one-way signal routing that leaves all existing signal processing just as it was.
Most people will not have much use for this, but it can be useful if you want to experiment with external applications or hardware signal processing applications.
Adding an External Send
Context-click on the processor box in a channel strip and choose Add new External Send. A dialog will appear containing the standard Ardour patchbay to allow you to connect the send to the desired destination. After you are done (or immediately, if you don't know where you want to send to at this point), close the window.
The send will appear in the processor box. Depending on whether you context-clicked above or below the fader, it will either before or after the fader.
Removing an External Send
You can remove an external send in several ways:
- Shift-right-click the send in the processor box
- Position the pointer over the send and press the Delete key
- Position the pointer over the send and press x
- Context-click the send and choose either
CutorDelete
Altering Send Levels
Just below the send in the processor box is a small fader that can be used like all other faders in Ardour to control the gain applied to the signal delivered by the send. Drag it to alter the level, Shift-click to restore to unity (0dB) gain.
Bypassing Sends
Click the small "led" in the send display within the processor box to turn it on and off. When turned off, silence will be delivered to the send. When turned on, the signal within the channel strip will be delivered.
Editing Send Routing
Double-clicking or Edit-clicking on the send in the processor box will redisplay the patchbay dialog that allows you full control over the routing of the send.
Inserts
Returns
Subgrouping
Subgrouping (sometimes known as "Grouping" or "Audio Grouping") is a way to collect related signals together, before they progress to the main mix.
When to use subgrouping
blah blah blah
To create a subgroup from an existing Track/Bus group
Context-click on the relevant group tab, and choose Add new subgroup bus. A new bus will be created and every member of the track group will have its outputs disconnected from other destinations and then connected to the new bus inputs. The bus outputs will feed the master bus unless you have selected manual connections for the session. Ths bus will be named based on the track group name,
To create a subgroup from a set of Tracks and Busses
Put them in a Track Group first, then follow the steps above.
Arbitrary (manual) subgrouping
The steps taken by the options above can all be done by hand if your needs are too specialized:
- Add a new bus, which we will call the "subgroup bus"
- For each track you want to feed the subgroup bus, connect its outputs to the inputs of the subgroup bus and disconnect them from the any other destinations. You can do this in the global audio patchbay or a track by track basis via the output button of each track's channel strip.
To remove a subgroup (bus)
Context click on the track group tab, and select Remove subgroup bus. You can also simply delete the bus itself. Note that this operation will not restore signal routing to the way it was before the addition of the subgroup bus - tracks that had been subgrouped will be left with their main outputs disconncted; you will need to manually connect them again in order to be able to hear the signal from their main outputs.
The Patchbay
The patchbay is the main way to make connections to, from and within Ardour's mixer.
Notable exceptions are aux sends and connections to the monitor bus (if you are using one): these cannot be controlled from a patchbay, and are basically not under manual control at all.

The patchbay presents two groups of ports; one set of sources (which produce data), and one of destinations (which consume data). Depending on the relative number of each, the sources will be placed on the left or the top of the dialogue, and the destinations on the right or the bottom. Thus, in general, signal flow is from top or left to right or bottom.
Both sources and destinations are divided up into groups, with each group being given a tab. Click on the appropriate tab to show the ports in each group (‘Ardour Busses’, ‘Ardour Tracks’ and so on).
The groups that are used are as follows:
- Hardware
- ports which are connected to a physical piece of hardware (a sound card or MIDI interface).
- Ardour Busses
- ports belonging to busses.
- Ardour Tracks
- ports belonging to tracks.
- Ardour Misc
- other ports that do not fit into the previous two categories; for example, the ports on which the metronome click is output, and MIDI ports for things like control surfaces and timecode.
- Other
- If you have other JACK clients running, their ports will be found here. If there are no such ports, the tab will not exist (on one or both axes of the grid).
The main body of the patchbay is a grid. Within this grid, green dots represent connections, and you can click in any of the squares to make or break connections. You can also click and drag to draw a line of connections, which is sometimes useful for making many connections at once.
In the example patchbay shown above we can note various things. We are using the ‘Ardour Tracks’ sources tab, so we see the output ports of the three tracks in our session: Fred, Jim and Foo. Our destinations are from the ‘Ardour Busses’ tab, so we have the inputs of a session bus, Sheila, and the inputs of the master bus. Fred and Jim have stereo outputs, so have L and R connections. Foo is a MIDI track, so it only has one connection, and its squares in the grid are coloured light grey to indicate that no connection can be made between Foo (a MIDI output) and our busses (which are all audio-input).
The green dots in the example show that both Foo and Bar are connected to the master bus, left to left and right to right.
Variants on the Patchbay
Slightly different versions of the patchbay are available from different places in Ardour. For a global view of all JACK audio connections, use the Audio Patchbay which can be opened from the Window menu, or by using Alt+P. A corresponding MIDI Connection Manager can be opened using Shift+Alt+P.
There is also a patchbay available when connecting individual tracks; clicking on the input or output buttons of a mixer strip will open a connection manager which has the corresponding track input or output as the only destination or source, with all other ports available for connection to it.
Other patchbay features
Context-clicking on a port name in the connection manager opens a menu which provides a few handy options:
- Add audio port and Add MIDI port
- these options add audio or MIDI ports to the thing that you opened the menu over, if this is possible. In this way, for example, tracks and busses can be extended to have more inputs or outputs.
- Remove
- removes the given port, if possible.
- Disconnect all from…
- disconnects everything from the given port.
- Rescan
- Ardour will try to keep abreast of any changes to the JACK ports on your system, and reflect them in any connection managers which are open. If for some reason this fails, choosing Rescan will re-scan the list of ports and update the manager.
- Show individual ports
- if you have a session which has lots of multi-channel tracks or busses, it may be an unnecessary detail that you have to connect left to left and right to right every time you make a connection. This obviously gets worse with higher channel counts (such as for 5.1 or ambisonics). To make life easier with such sessions, you can untick Show individual ports. After that, the channels of tracks and busses will be hidden, and any green dots you add in the connection manager will automatically connect each channel of the source to the corresponding channel of the destination (left to left, right to right and so on). In this mode, a half-circle in the connection grid indicates that some (but not all) of the source's ports are connected to the destination.
- Flip
- this will flip the visible ports on the vertical axis with those on the horizontal. If, for example, the top of the connection manager is showing ‘Ardour Busses’ and the right is showing ‘Hardware’, flip will swap the view to the opposite so that the top of the manager displays ‘Hardware’ and the right ‘Ardour Busses’. You can also flip by pressing f. Note that if there are no matching tabs on both axes, flipping will be impossible.
The Role of JACK
Editing and Arranging
Editing and Arranging
This chapter covers the following:
The Edit Point
Editing operations in a DAW like Ardour can be broken down according to how many points on the timeline are required to carry the operation out. Splitting a region for example, requires just one position on the timeline (the one where the split will happen). Cutting out a time range requires two positions, one for the start of the cut and one for the end.
In Ardour the edit point is the location where most single-point editing operations take place. It can be defined as one of the 3 possibilities:
- the playhead
- the position of the pointer (mouse or touch)
- the selected marker
The default edit point is the location of the pointer.
There are 2 keybindings available to cycle through the edit point options; the most common workflow tends to involve just switching back and forth between edit point = playhead and edit point = mouse (default `). Another binding ^ will cycle through all three choices (including the selected marker). You can also switch the edit point using a combo-selector just right of the snap/grid unit selector.
The Implict Range
In addition to explicit range selections made with the Range tool, Ardour also provides an implicit edit range. This edit range can be very useful if you want to edit by ear, rather than by mouse. If there is no regions selected, and no explicit range selection, then any editing operations that require a range (such as separate) will use the implicit edit range.
The implicit range is the area between the current edit point and some other position. In most cases it is either:
- The area between the mouse and the playhead OR
- The area between a selected marker and the mouse or playhead
Which of these is true depends on which edit point setting you are using (Mouse, Playhead or Marker) and whether
there is a selected marker at that time.
Selecting Regions
Many editing operations in Ardour require you to first select one or more regions that you want to change in some way. You can select a single region, or multiple regions, including regions in different tracks. When you select a region, it will appear in a darker color than unselected regions.
Note that if a track is a member of a group that is active and has the "Select" property enabled, then Ardour will attempt to match whatever selections you make in one track across every other track of the group. See Selection Equivalence for more information on precisely how selections will be propagated to other tracks.
Region Selection and Track Selection
Please read Region & Track Selection for more information on how selecting regions and selecting tracks interact.
To select a region
Click on the region. If smart editing is enabled, click in the lower half of the region.
To deselect a region
click the region. If smart editing is enabled, click in the lower half of the region.
Note that click simply toggles the selected status of an object, so it can be used to select unselected regions too
To select multiple regions in the same track
Do one of the following:
- click each region
- drag from a point in "empty space" in track before the first region you wish to select to a point within or after the last region you wish to select. You can use drag to do this multiple times
- if the regions are all adjacent to one another, click the first region you wish to select, then Shift-click the last region you wish to select
To select multiple regions in different tracks
click or Shift-click the regions you wish to select.
To select a region from the region list
Click the name of the region in the region list. Note that this will do nothing for whole-file regions, since they do not exist anywhere in a playlist or track.
To select all regions in a track
Context-click the track, and in the context menu, navigate to Select > Select All In Track
See the Track Context Menu for more information on other per-track selection operations that are available.
What Regions Are Affected?
What Regions Are Affected?
This section explains the rules used to decide what regions are affected by editing operations. You don't really have to understand them - hopefully things will Just Work - but it may be useful to understand the rules some of the time.
Ardour divides operations up into those that operate on a single point in time (Split being the obvious example) and those that operate on two points (which can also be considered to be a range of sorts), Separate is a good example of this.
Most operations will operate on the currently selected region(s), but if no regions are selected, the region that the mouse is in will be used instead. Single-point operations will generally pick a set of regions to use based on the following rules:
- If the edit point is `mouse':
- if the mouse is over a selected region, or no region, use all selected regions.
- if the mouse is over an unselected region, use just that region.
- For all other edit points
- use the selected regions and those that are both under the edit position
and on a selected track, or on a track which is in the same active edit-enabled route group
as a selected region.
- use the selected regions and those that are both under the edit position
The rationale here for the two different rules is that the mouse edit point is special in that its position indicates both a time and a track; the other edit points (Playhead,Marker) indicates only a time.
Snapping To The Grid
Snapping To The Grid
Ardour's editor utilizes a grid to assist in the placement of regions on the timeline, or with editing functions that need to happen on a specific time. With these buttons you can choose if you want the cursor and various objects to snap to this grid, and how you want the snapping to act. You can also modify what units the grid measures as well to fit your needs.
With grid mode set to "No Grid", all kind of objects can be moved freely along the timeline. "Grid" will restrict the positions to certain grid units (i.e. beats), "Magnetic" will snap to grid units, but it is still possible to move objects to other places.
Syncing Regions to the Grid
By default a region's beginning will snap to points along the timeline, but you can change this behaviour by setting a sync point in the region. Select the region(s) and press v . This will set the sync point to your edit point.
Grid Units
The selector next to the grid mode selector defines the size of the grid elements. The most useful settings are "Bars" and "Beats", but you can set your grid to several different units:
- CD Frames
- a CD Frame is 1/75th of a second. Snapping to CD Frames can be used to avoid issues with CD track lengths
- Timecode Frames/Seconds/Minutes
- These duration depend on the timecode settings for the session
- Seconds/Minutes
- These are absolute time units, unaffected by sample rate or timecode settings
- Beats/N
- Sets the grid to units of 1/N beats, where N can be 128, 64, 32, 16, 8, 7, 6, 5, 4, 3, 2. The duration of a grid unit will depend on the tempo and meter in effect at that point in the timeline.
- Beats
- Sets the grid to whole beats. The duration of a grid unit will depend on the tempo and meter in effect at that point in the timeline.
- Bars
- Sets the grid to whole bars. The duration of a grid unit will depend on the tempo and meter in effect at that point in the timeline.
- Markers
- Snaps positions to the nearest marker
- Region Starts
- Snaps positions to the nearest region start (see below)
- Region Ends
- Snaps positions to the nearest region end
- Region Syncs
- Snaps positions to the nearest region sync point
- Region Bounds
- Snaps positions to the nearest region start or end
To use Region starts/ends/syncs/bounds as snap choices, you must have either (a) NO tracks selected, which means that Ardour will snap to regions on any track, or (b) several tracks selected, and Ardour will only snap to regions on those selected tracks. If you are moving items on a track, and only the current track is selected, then you will only be able to snap to other regions on the same track. This means that enabling Edit > Preferences > Editor > Link Selections of Regions and Tracks will make the "Region" grid units unusable. Avoid the use of this option if you are going to use any of the Region grid units.
Snap Modes
Ardour supports three different types of snapping to the grid:
- No Grid
- disables the grid. All objects can be moved freely in this mode.
- Grid
- activates normal snapping, all positions of objects are restricted to points of the grid. (See Grid Units on how to change these points) If you try to move an object in "Grid"-mode, it will not change its position until you move the mouse far enough for the object to reach the next grid point. New objects will always be created at grid points, too.
- Magnetic
- is a less strict type of snapping. Objects can still be moved to any position, but positions close to grid points will snap to the grid point. In order to move an object very close to a grid point, it may be necessary to zoom in to prevent snapping to that point.
Common Region Editing Operations
Common Region Editing Operations
This section covers a set of region editing operations that you will likely use again and again while working on a session. Depending on your working habits (and experience of other DAWs) some of them will be critical while others may be more rarely used.
All of these operations can be carried out from the keyboard. Default keybindings can be found in the list. Equivalent operations can be done with mouse in most cases.
You may want to review your understanding of the edit point/range and which regions will be affected by region operations.
- Spot (Align)
- move selected regions to the edit point
- Split
- split selected regions at the edit point
- Trim Start
- Adjust the start of selected regions to the edit point (or as close as possible)
- Trim End
- Adjust the end of selected regions to the edit point (or as close as possible)
- Duplicate
- Make a copy of each selected region and position it immediately after the original
- Crop
- Truncate selected regions to the edit range
- Separate
- Split selected regions at both ends of the edit range
- Set Fade In
- Adjust selected audio regions' fade in to end at the edit point
- Set Fade Out
- Adjust selected audio regions' fade out to end at the edit point
- Toggle Fade In
- Turn selected audio regions' fade in on or off
- Toggle Fade Out
- Turn selected audio regions' fade out on or off
- Play Region
- Play session from the start of the earliest selected region
- Zoom To Region
- Zoom horizontally so that the selected regions span the editor track view
- Set Sync Point
- Set the sync point of all selected regions to the edit point
- Insert
- Inserts the currently selected regions in the Region List at the edit point
Changing Region Lengths
Changing Region Lengths
Changing the length of a region is a very common editing operation, often known as "trimming". There are several ways to accomplish this with Ardour, and some very useful specialized trimming operations.
Drag-Trimming with the mouse
In object mode, move the pointer near the beginning or end of the region. The cursor will change to indicate that trimming is possible, and you then Left-click-and-drag the edge of the region.
Trimming will obey Snap settings.
Click Trimming with the mouse
Left-click in the colored bar at the bottom of a region. If you are nearer to the start of a region, this will trim the start time to the position of the pointer. If you are nearer to the end of a region, it will trim the end time.
Keyboard bindings for Trimming
There are several commands for region trimming. Some use the edit point to determine where to trim to. Some are not bound to any keys by default (but could be via the Keybindings Editor).
- Region/trim-front j
- trim selected region(s) start to edit point
- Region/trim-end k
- trim selected region(s) end to edit point
Trim to Next/Previous Region
Sometimes you just want to extend the start or end of region so that it reaches the end or start of an adjacent region. There is now an operation accessible from the region context menu, under Edit >Trim > Trim to Next or Edit > Trim > Trim to Previous. This will extend the selected regions so they directly adjoin their neighbours, unless their source files are not long enough, in which case they will be extended to the maximum possible. Trim to Next will extend the end of the selected regions to the start of the next region; Trim to Previous will extend the start of the selected regions to the end of the previous region.
- Region/trim-to-previous-region j
- trim the start of selected region(s) to the end of the previous region
- Region/trim-to-next-region k
- trim the end of selected region(s) to the start of the following region
Other Possible Commands for Trimming
These are not bound to any keys by default, but could be via the Keybindings Editor. They can also be sent via OSC or other control protocols.
- Region/trim-region-to-loop
- Trim region to match the current loop range
- Region/trim-region-to-punch
- Trim region to match the current punch range
Push/Pull Trimming
Push/Pull Trimming
Normally when you trim regions by dragging with the mouse, it affects only the selected regions. Their lengths are directly affected by the trim operation, but nothing else is. Sometimes though, you'd like to trim a region that directly adjoins another, and keep this relationship the same - you're not trying to make one of the regions extend over the other - you'd like the junction to move in one direction or the other as part of the trim. This requires trimming both regions on either side of the junction, in opposite directions. Push/Pull trim, activated by pressing shift key before starting the drag, will do just that. Here's a few pictures to show the difference in the results of a normal trim and push/pull trim. First, the initial situation:

Now lets look at what happens after we trim the right hand (selected) region by dragging its starting position earlier:

You can see that it now overlaps the earlier region and a cross fade has been created between them.
Lets look now at what happens if we do the same trim, but using shift-drag to turn it into a push-pull trim instead:

There is no overlap, and the end of the earlier region has been moved along with the start of the later region, so that they still directly adjoin each other.
Copying Regions
To Copy A Region
To copy a region, make sure you are in object mouse mode. Move the mouse pointer into the region Left-click and drag. A new region is created and will follow the mouse pointer as it moves. See "moving Regions" for more details on moving the copied region around.
Copying more than one region
To copy multiple regions, select them before copying. Then click+drag on one of the selected regions. All the regions will be copied and as they move, the will keep their positions relative to each other.
Fixed-time copying
If you want to copy region(s) to other track(s) but keep the copies at the exact position on the timeline as the originals, simply use Middle-click-drag instead.
Moving Regions
Moving and Copying Regions
Moving and copying regions may be affected by the current edit mode. Ardour has the following edit modes:
- Slide
- Regions can be freely moved, and overlaps will be created when necessary
- Lock
- No region motion is possible at all
- Splice
- Regions can be moved freely, but Ardour will close all gaps between regions after any movement has occured
The edit mode is set via a combo selector at the left of the editing toolbar.
If "Snap To Grid" is enabled, then regions can only moved so that they align with locations determined by the current snap settings (beats, or seconds, or other region boundaries, etc). See Snapping To The Grid.
Moving Regions With the Mouse
To move or copy a region, make sure you are in object mode. If you are using "smart mode", the pointer must be in the lower half of the region to begin a move or copy operation.
Move the pointer into the region, use Left-click-drag. The region will follow the pointer as you move it around. By default, the region can move freely along the timeline.
To move a region from one track to another, simply start a move as described above, but move the pointer into the desired track. The region will follow the pointer. Note that if you have other kinds of "tracks" visible, the region will remain where it is as the pointer moves across them, and will then jump to the new track. This serves as a visual reminder that you cannot drag an audio region into an automation track or a bus, for example.
Moving more than one region
To move multiple regions, select them before moving. Then click+drag on one of the selected regions. All the regions will move, keeping their positions relative to each other.
Fixed-time motion
Sometimes, you want to move a region to another track, but keeping its position along the timeline exactly the same. To do this, use Middle-click-drag instead.
Aligning (Spotting) Regions
Aligning regions (sometimes called "spotting") means moving one or more regions based on a defined location, which in Ardour is always the edit point. An alignment operation moves the region(s) so that some part of the region is positioned at the edit point. Available alignment commands include:
- Align Region starts a
- Selected region(s) are moved so that their start is located at the current edit point
- Align Region ends a
- Selected region(s) are moved so that the end is located at the current edit point
- Align Region sync points Shift-a
- Selected region(s) are moved so that their sync point is located at the current edit point
- Align Region starts relative a
- Selected region(s) are moved so that the start of the earliest region is located at the current edit point, and all others maintain their relative position relative to that region
Separation
Separation
Separate Range
Separate Range
A final new editing feature is an operation in the context menu of a range labelled "Separate Regions Under Range". This will split any selected regions that are covered by the range at both ends of the range (or just one, if the range only covers part of the region). This makes it easy to generate regions that correspond precisely to a range.
Separate Under
Separate Under
You may have a situation where you've positioned one region over another, and you just want to cut the lower region so that it directly adjoins both ends of the overlapping one, with no overlaps. To do this, select the upper region, then choose Edit > Separate > Separate Under. This will split the lower region so that it no longer overlaps the upper region at all. Here is an example where we start with a short region placed so that it overlaps a longer region:

Now we perform the separate under edit, and the lower region has been split in two, with boundaries exactly positioned at the edges of the upper region:

If the lower region is only covered at one end by the upper region, then this operation is equivalent to Trim to Next or Trim to Previous, depending on which end is covered.
Stripping SiIence from Audio Regions
Stripping SiIence from Audio Regions
Selecting Edit > Strip Silence from the region context menu will detect silence (based on a user-chosen threshold in dBFS), split a region based on the boundaries of the silent segments, and remove the silence. You can also specify a minimum length for silence, which can useful when editing very percussive material and just needing to automatically trim the ends of a region. The dialog looks like this:

The edit will be carried out on all selected regions, allowing batch processing. You can also see in the screenshot how the main editor window is used to show silent segments and report the number and durations of the shortest segments.
Editing MIDI
Editing MIDI
Ardour's handling of MIDI editing is a bit different from most other DAWs and MIDI sequencers.
Key features of Ardour MIDI handling
- All editing is done in-place, in-window. There is no separate piano roll window or pane. Edit notes right where you see them.
- All MIDI I/O is done via JACK for sample accurate timing and maximal efficiency when communicating with external software synthesizers
- Every MIDI track has its own JACK MIDI port for input; it may have an arbitrary combination of audio and MIDI outputs, depending on the signal processing in the track; the full flexibility of JACK connectivity is present for MIDI just as it is for audio.
- Full automation for MIDI tracks, integrated with the handling of all MIDI CC data for each track
- Controllers (CC data) can be set to discrete or continuous modes (the latter will interpolate between control points and send additional data)
- Normal or Percussive mode for note data editing
- The "scroomer" (a combination scroll/zoom tool) for altering the zoom level and range of visible MIDI data
Notable Differences
- As mentioned above, all editing is done in-place
- Fader (volume) control currently operates on transmitted MIDI data, not by sending CC #7
- All note/data editing is per-region. There are no cross-region operations at this time
- By default, copying a MIDI region creates a "deep link" or "cloned copy" - both regions share the same data source, and edits to the contents of one will affect the other. To break this link, select
MIDI > Unlink from other copiesfrom the region context menu, after which the selected region(s) will have their own copies of only the data that they visually display on screen. You will not be able to trim the region back its "original" length after an Unlink operation, and the operation cannot be undone.
Fundamental Concepts for MIDI Editing
Fundamental Concepts for MIDI Editing
Ardour's MIDI editing is based on a few basic principles:
- Editing should be done without having to enter a new window
- Editing should be able to carried out completely with the keyboard, or completely with the mouse, or with any combination of the two.
Currently MIDI editing is primarily restricted to note data. Other kinds of data (controller events, sysex data) are present and can be added and deleted, but not actually edited.
Fundamentals of MIDI Editing in Ardour 3
MIDI, just like audio, exists in "regions". MIDI regions behave like audio regions: they can be moved, trimmed, copied, (cloned) or deleted. Ardour allows either editing MIDI (or audio) regions, or MIDI region content (the notes), but never both at the same time. The "e" key (by default) toggles between "region level" and "note level" editing, as will double-clicking on a MIDI region.
One very important thing to note: editing note information in Ardour 3.0 occurs in only a single region. There is no way currently to edit in note data for multiple regions at the same time, so for example you cannot select notes in several regions and then delete them all, nor can you copy-n-paste notes from one region to another. You can, of course, copy and paste the region(s), just as with audio.
Creating MIDI Tracks
Creating MIDI Tracks
To create a new MIDI track, choose Session > Add Track/Bus. In the Add Track/Bus dialog, pick "MIDI Track" from the combo selector at the upper right.
You may decide to use a track template if you have one. You may also know the instrument (a plugin that will generate audio in response to receiving MIDI) that you want to use in the track. The Instrument selector will show you a list of all plugins that you have which accept MIDI input and generate audio output.
Creating MIDI Regions
Creating MIDI Regions
Although recording MIDI is a common way to create new MIDI regions, it is often desirable to do so as part of editing/arranging.
To create a new MIDI region, simply Left-click in a MIDI track. A region will be created that is one bar long. You can trim it to any length you want.
Once you have created a region, you will probably want to Add some notes to it.
Adding New Notes
Adding new notes
In general, you will probably do most MIDI editing with the mouse in object mode. This allows you to select notes, copy, move or delete them and alter their properties (see below). But at some point, you're going to want to add notes to a MIDI region using the mouse, and if they are to be anything other than a fixed length, this means dragging with the mouse. Since this would normally be a selection operation if the mouse is in object mode, there needs to be some way for you to tell Ardour that you are trying to "draw" new notes within a MIDI region. Ardour provides two ways do this. One is to leave the mouse in object mode and press the control key while dragging (on OS X, use the Command key). The other, useful if you plan to enter a lot of notes for a while, is to switch the mouse into "Draw Notes" mode, which will now interpret any drags and clicks as requests to add a new note. For obvious reasons, you cannot use "Draw Notes" mode while using region-level editing.
So, to summarize:
- Selecting, moving, copying, trimming, deleting regions
- leave "Note Level Editing" disabled, use object, range or other mouse modes
- Selecting, moving, copying trimming, deleting notes
- enable "Note Level Editing" and use mouse object mode.
- Adding new notes
- enable "Note Level Editing" and then either
- use mouse object mode and Ctrl-drag (Cmd-drag on OS X)
- use mouse draw mode
Note that is also a a step entry editor allowing you to enter notes from a virtual keyboard and lots more besides.
Changing Note Properties
Changing Note Properties
You can view all the details about a selected note by context-clicking on it. The dialog that pops up will also allow you to modify all the properties of the selected note(s). You can modify individual properties more efficiently using the techniques described below.
Moving notes
Right arrow and Left arrow move the selected note(s) early and later in time.
Changing pitch values
The up arrow key increases the pitch of the selected notes. The down arrow key reduces the pitch of the selected notes. If any of the selected notes are already at the maximum or minimum value, no changes will be made to any of the notes, to preserve relative pitches. You can override this with the Alt/Option key. The default shift distance is one semitone. Use the Shift modifier to alter this to one octave.
Changing velocity values
Up arrow increases the velocity of the selected notes. The Down arrowreduces the velocity of the selected notes. If any of the selected notes are already at the maximum or minumum value, no changes will be made to any of the notes, to preserve relative velocities. You can override this with the Alt/Option key.
You can also press v to popup a dialog that will allow you to set the absolute velocity value of each selected note.
Finally, the scroll wheel will also adjust notes in the same way as the arrow keys (note that like the arrow keys it only affects selected notes, not the note the pointer is over).
Changing channel
Press the "c" key to bring up a dialog that allow you to see and alter the MIDI channel of the selected notes. If the selected notes use different channels, they will all be forced to the newly selected channel.
Changing start/end/duration
Comma (',') will alter the start time of the note. Period ('.') will alter the end time of the note. Both keys will by default make the note longer (either by moving the start earlier or the end later). For the opposite effect, use Ctrl-comma/Ctrl-period (or Cmd-command/Cmd-period on OS X). The note will be altered by the current grid setting. To change the start/end positions by 1/128th of a beat, use the Alt/Option key along with either Comma, Ctrl-Comma, etc.
Quantization
The q key will quantize the selected notes using the current quantize settings. If the quantize settings have not been set for this session yet, the quantize dialog will appear. Alt/Option-q will display the quantize dialog to allow you to reset the quantize settings and then quantizes the selected notes. The default quantize settings are: quantize note starts to the current grid setting, no swing, no threshold, full strength.
Step Entry, Quantize etc.
Handling Overlapping Notes
Handling Overlapping Notes
Every MIDI note consists of two messages, a NoteOn and a NoteOff message. Each one has a note number and a channel (also a velocity, but that isn't relevant here). The MIDI standard stresses that it is invalid to send a second NoteOn for the same note number on the same channel before a NoteOff for the first NoteOn. It is more or less impossible to do this with a physical MIDI controller such as a keyboard, but remarkably easy to trigger when editing in a DAW - simply overlapping two instances of the same note will do it.
Ardour offers many options for how to deal with instances where you overlap two instances of the same note. Which one to use is a per-session property and can be modified from Session > Properties > Misc > MIDI Options
- never allow them
- Edits that would create note overlaps are not allowed
- don't do anything in particular
- Ardour leaves overlapping notes alone - the behaviour of a MIDI receiver (plugin or hardware) is undefined
- replace any overlapped existing note
- When one note is moved to overlap another, remove the one that wasn't being moved
- shorten the overlapped existing note
- When one note is moved to overlap another, shorten the one that wasn't moved so that there is no overlap
- shorten the overlapping new note
- When one note is moved to overlap another, shorten the one that was moved so that there is no overlap
- replace both overlapping notes with a single note
- When one note is moved to overlap another, merge them both to form one (longer) note
Changing the option in use will not retroactively make changes - it will only affect new note overlaps created while the option remains chosen.
Ardour does not check for note overlaps across tracks or even across regions. If you create these, it is your responsibility to deal with the consequences.
Note Cut, Copy and Paste
Note Cut, Copy and Paste
While in note edit mode, selected notes can be cut using x, copied with c and deleted with Delete, just as regions can. Once cut or copied, they can be pasted at the edit point using v.
Note Selection
Selecting/Navigating note-by-note
Tab selects the next note. Tab selects the previous note. Shift-Tab or Tab adds the next/previous note to the selection.
Selecting notes with the mouse
While in mouse object mode, you can click on a note to select it. Once you've selected one note, shift-click on another to select all notes between them. To add or remove a note to/fromt the selection, use click. You can also click and drag outside of a note to "rubberband select" a series of notes.
Three different selection operations are possible if you switch to mouse range mode:
- Vertical drags within the MIDI region will select all notes within the spanned note range
- Clicks on the piano header of the track (if visible - the track must be tall enough to display it) will select all occurences of that note
- Drags on the piano header of the track will select all notes within the spanned note range
Listening to Selected Notes
if Edit > Preferences > MIDI > Sound MIDI notes as they are selected is enabled, Ardour will send a pair of NoteOn/NoteOff messages through the track, which will typically allow you to hear each note as it is selected.
Quantizing MIDI
Quantizing MIDI

Accessed via the "q" key, the dialog includes:
- Options for grid, legato amd groove quantize
- Snap note start, or end
- Snap to current grid, or many beat subdivisions
- Quantize threshold (how far away from a chosen position a note must be in order to be quantized)
- Strength (how close to move a note to its new position, as a percentage of the nominal distance)
- Swing
Step Entry
Step Entry
Sometimes you'll want to edit MIDI data directly from a connected MIDI device like a music keyboard or pad controller. Sometimes you'll want to use the mouse. Sometimes you'll want the fine-grain control, precision and speed of entry that comes from using a custom note entry dialog.
The step entry dialog is accessed via a right click context menu on the rec-enable button (its there because step entry is related to recording MIDI data. You cannot simultaneously step edit and record MIDI via the track's MIDI port.

The dialog (quite closely modelled on Logic's) contains:
- Chord entry switch (successive notes are stacked in a chord until it is released
- Note length selectors
- Triplet toggle
- Normal, single, double and triple dotted note selectors
- Sustain button
- Buttons to:
- Insert a rest of the current selected note duration
- Insert a rest of the current grid step size
- Move back to the last inserted note
- Move forward to the next beat, or bar
- Move forward to the edit point
- Dynamics controls from pianississimo to fortississimo
- Channel selector
- Explicit numerical velocity selector, for more precise control than the dynamics selectors
- Octave selector
- Buttons to add bank or program change events
- a full 10 octave virtual keyboard
More or less all actions in the step entry dialog can be driven directly from the keyboard, so you do not need to keep moving back and forth from keyboard to mouse to do complex data insertion.
The step entry dialog is accessed via a right click context menu on the rec-enable button (its there because step entry is related to recording MIDI data. You cannot simultaneously step edit and record MIDI via the track's MIDI port.
Using Patch Changes
Using Patch Changes
A ‘patch change’ is Ardour's description for a combination of MIDI program change and bank select messages, that (typically) instruct a synthesizer or sampler to select a different sound to use on a particular channel.
Patch changes are shown within MIDI regions as small rectangles or "flags", as shown below:
Inserting Patch Changes
Ensure that the edit point is located where you want the patch change to be (within an existing MIDI region). Context click, and from the MIDI region's context menu, select MIDI > Insert Patch Change. A dialog will appear allowing you to set the bank and program values.
Modifying Patch Changes
Context-clicking on a patch change will bring up the same dialog that was used to create it, allowing you to modify the program and/or bank numbers.
You can also use the mousewheel: regular scroll on the patch change will alter the program number, scroll will modify the bank number.
Moving Patch Changes
Just Left-click-and-drag on the patch change to move it around.
Removing Patch Changes
Put the mouse pointer into the rectangular area, and press Delete or use the delete mouse button operation. This will remove the patch change (the operation can be undone).
Names for Patch Numbers: MIDNAM files
Automation
Automation
This chapter covers the following:
Mixing
Mixing
This chapter covers the following:
Muting and Soloing
Each track and bus has two buttons which have important implications for signal flow: mute and solo. The behaviour of these buttons is configurable in Ardour, so that they can behave in one of a few different ways to suit different studio set-ups.
Without a monitor bus
If you are using Ardour without a monitor bus, there is only one way in which mute and solo will work. Without a monitor bus:
- Mute on a track or bus will mute that track on the master bus, so that it will not be heard.
- Solo on a track or bus will solo that track or bus and mute all others except that soloing a bus will also solo any tracks or busses that feed that bus.
With a monitor bus
For setups with a monitor bus, you have more options, mostly governed by the setting of the ‘Solo controls are Listen controls’ option in the Solo / mute tab of ‘Ardour Preferences’.
With ‘Solo controls are Listen controls’ unticked, behaviour is almost exactly the same as the situation without a monitor bus. Mute and solo behave the same, and the monitor bus is fed from the master bus, so it sees the same thing.
With ‘Solo controls are Listen controls’ ticked, things change; the master and monitor busses behave differently. In this mode, solo controls are more properly called ‘listen’ controls, and Ardour's solo buttons will change their legend from ‘S’ to either ‘A’ or ‘P’ (we'll come to that shortly) to reflect this.
Now, without any mute or listen, the monitor bus remains fed by the master bus. Also:
- Mute will mute the track or bus, so that it will not be heard anywhere (neither on the master nor monitor busses), much as before.
- Listen will disconnect the monitor bus from the master bus, so that the monitor bus now only receives things that are ‘listened’. Listen will not perform any muting, and hence the master bus will not be affected by a listened track or bus.
There are further options with when solo controls are listen controls: the part of the track or bus from which the listen signal is obtained can be configured. Underneath the ‘Solo controls are Listen controls’ option in ‘Ardour Preferences’ is an option for ‘listen position’, which can be either After-Fade Listen (AFL) or Pre-Fade Listen (PFL). AFL, as its name suggests, obtains its signal from some point after the track or bus’ fader, and PFL from before it. The precise point to get the signal from can further be configured using the ‘PFL signals come from’ and ‘AFL signals come from’ options.
The solo-mute arrangement with a monitor bus is shown below:

Here we have a number of tracks or busses (in orange). Each one has an output which feeds the master bus. In addition, each has PFL and AFL outputs; we have a choice of which to use. PFL/AFL from each track or bus are mixed. Then, whenever anything is set to AFL/PFL, the monitor out becomes just those AFL/PFL feeds; the rest of the time, the monitor out is fed from the master bus.
In this scheme Solo has no effect other than to mute other non-soloed tracks; with solo (rather then listen), the monitor out is fed from the master bus.
Other solo options
There are a few other configuration options related to the behaviour of solo. They can be found in the Solo / Mute tab of Ardour Preferences dialogue.
Solo-in-place mute cut
When using ‘solo-in-place’ (SiP), in other words when soloed tracks are being listened to on the master bus, this fader specifies the gain that will be applied to other tracks in order to mute them. Setting this level to -∞dB will mean that other tracks will not be heard at all; setting to some higher value less than 0dB means that other non-soloed tracks will be heard, just reduced in volume compared to the soloed tracks. Using a value larger than -∞dB is sometimes called "Solo-In-Front" by other DAWs, because the listener has the sense that soloed material is "in front" of other material. In Ardour, this is not a distinct mode, but instead the mute cut control offers any level of "in-front-ness" that you might want to use.
Exclusive solo
If this is enabled, only one track or bus will ever be soloed at once; soloing track B while track A is currently soloed will un-solo track A before soloing track B.
Show solo muting
If this is enabled, the mute button of tracks and busses will be drawn outlined to indicate that the track or bus is muted because something else is soloed. This is enabled by default, and we recommend that you leave it that way unless you are extremely comfortable with Ardour's mute/solo behaviour
Soloing overrides muting
If this is enabled, a track or bus that is both soloed and muted will behave as if it is soloed.
Mute affects…
These options dictate whether muting the track will affect various routes out of the track; through the sends, through the control outputs (to the monitor bus) and to the main outputs.
Panning Control
Panning Control
Exporting
Exporting
This chapter covers the following:
Synchronization
Synchronization
Ardour can be synchronized with a variety of external devices and other software.
This chapter covers the following:
Default Keyboard Bindings
Default Keyboard Bindings
Although (almost) every key binding ("shortcut") in Ardour can be redefined, the program comes with a rich set of default bindings. The default bindings are "mnemonic" in that they focus on trying use to the letter that starts the name of an operation as the binding for that operation. This is not always possible, but it acts as a general rule. This does not necessarily lead to the best ergonomics for rapid editing - there are alternative binding sets for that - but it does make it simpler for newcomers to remember some of the most common bindings (e.g. "s" for "Split", "p" for "position playhead").
The conventions for using modifier keys (Control, Alt, Command etc.) differ from platform to platform, so we provide different bindings for each platform.
Mnemonic Bindings for Linux
Mnemonic Bindings for Linux
A printable cheat-sheet with these bindings is available for downloading.
Transport & Recording Control
- destroy last recording
- Control+Delete
- engage record
- Shift+r
- fast forward
- Shift+→
- loop play (the loop range)
- l
- rewind
- Shift+←
- set playhead position
- p
- start recording
- Shift+space
- stop (keep loop/range play)
- Control+Alt+space
- stop and destroy
- Control+space
- toggle auto play
- 5
- toggle auto return
- 6
- toggle click (metronome)
- 7
- toggle playhead follows edits
- Shift+f
- toggle playhead tracking
- Control+f
- toggle roll
- space
- toggle track rec-enable
- Shift+b
- toggle track solo status
- Alt+s
- transition to reverse
- Shift+↓
- transition to roll
- Shift+↑
Session & File Handling
- add track(s) or bus(ses)
- Control+Shift+n
- export session
- Win+e
- import audio files
- Control+i
- open a new session
- Control+n
- open a recent session
- Control+Shift+o
- open an existing session
- Control+o
- quit
- Control+q
- save session
- Control+s
- snapshot session
- Control+Shift+s
- toggle sel. track MIDI input
- Alt+i
Changing What's Visible
- fit tracks vertically
- f
- move selected tracks down
- Control+↓
- move selected tracks up
- Control+↑
- scroll down (page)
- PageDown
- scroll down (step)
- ↓
- scroll up (page)
- PageUp
- scroll up (step)
- ↑
- toggle editor window mixer
- Shift+e
- toggle last 2 zoom states
- Shift+z
- zoom (x) to selected region(s)
- Control+Alt+z
- zoom (x+y) to selected region
- Alt+z
- zoom in
- =
- zoom out
- -
Window Visibility
- toggle locations dialog
- Alt+l
- focus on main clock
- KP_Divide
- maximise editor space
- Control+Alt+f
- rotate editor & mixer window
- Alt+m
- show rhythm ferret window
- Alt+f
- toggle big clock
- Alt+b
- toggle color manager
- Alt+c
- toggle editor window
- Alt+e
- toggle global audio patchbay
- Alt+p
- toggle global midi patchbay
- Alt+Shift+p
- toggle key bindings editor
- Alt+k
- toggle preferences dialog
- Alt+o
- toggle preferences dialog
- Control+Shift+p
Editing with Edit Point
Most edit functions operate on a single "Edit Point". The edit point can be any of: playhead (default), the mouse or an active marker. The choice of Edit Point (by default) also sets the Zoom Focus.
- EP to next region sync
- ;
- EP to prev region sync
- '
- cycle to next grid snap mode
- 2
- cycle to next zoom focus
- 1
- insert from region list
- i
- insert time
- Control+t
- move EP to playhead
- Alt+Return
- next EP w/marker
- Control+^
- next EP w/o marker
- `
- trim back
- k
- trim front
- j
- trim region end to edit point
- Shift+}
- trim region start to edit point
- Shift+{
- trim region to end of prev region
- Control+j
- trim region to start of next region
- Control+k
- use next grid unit
- 3
- use next grid unit
- 4
- use next musical grid unit
- Control+4
- use previous grid unit
- Control+3
Aligning with the Edit Point
Align operations move regions so that their start/end/sync point is at the edit point. "Relative" operations
just align the first region and moves other selected regions to maintain relative positioning.
- align end(s)
- Alt+a
- align start(s)
- Control+Win+a
- align start(s) relative
- Win+a
- align sync points
- Shift+a
- align sync points (relative)
- a
- range end to next prev edge
- Control+>
- range end to next region edge
- >
- range start to next region edge
- Control+<
- range start to prev region edge
- <
Edit Point Playback
- play edit range
- Alt+space
- play from EP & return
- Win+space
- play selected region(s)
- h
Region Operations
- duplicate region (multi)
- Shift+d
- duplicate region (once)
- Alt+d
- export selected region(s)
- Control+Win+e
- increase region gain
- ^
- move to original position
- Alt+o
- mute/unmute
- Control+m
- normalize
- n
- nudge backward
- KP_Subtract
- nudge forward
- KP_Add
- quantize MIDI notes
- q
- reduce region gain
- &
- reverse
- Alt+r
- set fade in length
- /
- set fade out length
- \
- set region sync point
- v
- split
- s
- toggle fade in active
- Control+/
- toggle fade out active
- Control+\
- transpose
- Alt+t
Edit Range
There are only a few functions that refer to an "Edit Range". The current edit range is defined using combinations of the possible edit points: Playhead, Marker or Mouse.
- copy
- Control+c
- cut
- Control+x
- delete
- Delete
- paste
- Control+v
- redo
- Control+r
- undo
- Control+z
Selecting
- all after playhead
- Shift+Control+p
- all before playhead
- Control+p
- all enclosed by edit range
- Control+u
- all present in edit range
- u
- convert edit range to range
- F6
- invert selection
- Shift+i
- select all after EP
- Control+Shift+e
- select all before EP
- Control+e
- select all in loop range
- Control+l
- select all in punch range
- Control+d
- select everything
- Control+a
- select next track/bus
- Alt+↓
- select previous track/bus
- Alt+↑
Defining Loop, Punch Range and Tempo Changes
- set loop range from edit range
- ]
- set loop range from region(s)
- Alt+]
- set punch range from edit range
- [
- set punch range from region(s)
- Alt+[
- set tempo (1 bar) from edit range
- 0
- set tempo (1 bar) from region(s)
- 9
Mnemonic Bindings for OS X
Mnemonic Bindings for OS X
A printable cheat sheet for these bindings is available for download.
Transport & Recording Control
- destroy last recording
- Cmd+Delete
- engage record
- Shift+r
- fast forward
- Shift+→
- loop play (the loop range)
- l
- rewind
- Shift+←
- set playhead position
- p
- start recording
- Shift+space
- stop (keep loop/range play)
- Cmd+Control+space
- stop and destroy
- Cmd+space
- toggle auto play
- 5
- toggle auto return
- 6
- toggle click (metronome)
- 7
- toggle playhead follows edits
- Shift+f
- toggle playhead tracking
- Cmd+f
- toggle roll
- space
- toggle track rec-enable
- Shift+b
- toggle track solo status
- Control+s
- transition to reverse
- Shift+↓
- transition to roll
- Shift+↑
Session & File Handling
- add track(s) or bus(ses)
- Cmd+Shift+n
- export session
- Mod1+e
- import audio files
- Cmd+i
- open a new session
- Cmd+n
- open a recent session
- Cmd+Shift+o
- open an existing session
- Cmd+o
- quit
- Cmd+q
- save session
- Cmd+s
- snapshot session
- Cmd+Shift+s
- toggle sel. track MIDI input
- Control+i
Changing What's Visible
- fit tracks vertically
- f
- move selected tracks down
- Cmd+↓
- move selected tracks up
- Cmd+↑
- scroll down (page)
- PageDown
- scroll down (step)
- ↓
- scroll up (page)
- PageUp
- scroll up (step)
- ↑
- toggle editor window mixer
- Shift+e
- toggle last 2 zoom states
- Shift+z
- zoom (x) to selected region(s)
- Cmd+Control+z
- zoom (x+y) to selected region
- Control+z
- zoom in
- =
- zoom out
- -
Window Visibility
- toggle locations dialog
- Control+l
- focus on main clock
- KP_Divide
- maximise editor space
- Cmd+Control+f
- rotate editor & mixer window
- Control+m
- show rhythm ferret window
- Control+f
- toggle big clock
- Control+b
- toggle color manager
- Control+c
- toggle editor window
- Control+e
- toggle global audio patchbay
- Control+p
- toggle global midi patchbay
- Control+Shift+p
- toggle key bindings editor
- Control+k
- toggle preferences dialog
- Control+o
- toggle preferences dialog
- Cmd+Shift+p
Editing with Edit Point
Most edit functions operate on a single "Edit Point". The edit point can be any of: playhead (default), the mouse or an active marker. The choice of Edit Point (by default) also sets the Zoom Focus.
- EP to next region sync
- ;
- EP to prev region sync
- '
- cycle to next grid snap mode
- 2
- cycle to next zoom focus
- 1
- insert from region list
- i
- insert time
- Cmd+t
- move EP to playhead
- Control+Return
- next EP w/marker
- Cmd+^
- next EP w/o marker
- `
- trim back
- k
- trim front
- j
- trim region end to edit point
- Shift+}
- trim region start to edit point
- Shift+{
- trim region to end of prev region
- Cmd+j
- trim region to start of next region
- Cmd+k
- use next grid unit
- 3
- use next grid unit
- 4
- use next musical grid unit
- Cmd+4
- use previous grid unit
- Cmd+3
Aligning with the Edit Point
Align operations move regions so that their start/end/sync point is at the edit point. "Relative" operations
just align the first region and moves other selected regions to maintain relative positioning.
- align end(s)
- Control+a
- align start(s)
- Cmd+Mod1+a
- align start(s) relative
- Mod1+a
- align sync points
- Shift+a
- align sync points (relative)
- a
- range end to next prev edge
- Cmd+>
- range end to next region edge
- >
- range start to next region edge
- Cmd+<
- range start to prev region edge
- <
Edit Point Playback
- play edit range
- Control+space
- play from EP & return
- Mod1+space
- play selected region(s)
- h
Region Operations
- duplicate region (multi)
- Shift+d
- duplicate region (once)
- Control+d
- export selected region(s)
- Cmd+Mod1+e
- increase region gain
- ^
- move to original position
- Control+o
- mute/unmute
- Cmd+m
- normalize
- n
- nudge backward
- KP_Subtract
- nudge forward
- KP_Add
- quantize MIDI notes
- q
- reduce region gain
- &
- reverse
- Control+r
- set fade in length
- /
- set fade out length
- \
- set region sync point
- v
- split
- s
- toggle fade in active
- Cmd+/
- toggle fade out active
- Cmd+\
- transpose
- Control+t
Edit Range
There are only a few functions that refer to an "Edit Range". The current edit range is defined using combinations of the possible edit points: Playhead, Marker or Mouse.
- copy
- Cmd+c
- cut
- Cmd+x
- delete
- Delete
- paste
- Cmd+v
- redo
- Cmd+r
- undo
- Cmd+z
Selecting
- all after playhead
- Shift+Cmd+p
- all before playhead
- Cmd+p
- all enclosed by edit range
- Cmd+u
- all present in edit range
- u
- convert edit range to range
- F6
- invert selection
- Shift+i
- select all after EP
- Cmd+Shift+e
- select all before EP
- Cmd+e
- select all in loop range
- Cmd+l
- select all in punch range
- Cmd+d
- select everything
- Cmd+a
- select next track/bus
- Control+↓
- select previous track/bus
- Control+↑
Defining Loop, Punch Range and Tempo Changes
- set loop range from edit range
- ]
- set loop range from region(s)
- Control+]
- set punch range from edit range
- [
- set punch range from region(s)
- Control+[
- set tempo (1 bar) from edit range
- 0
- set tempo (1 bar) from region(s)
- 9
Preferences and Session Properties
Ardour splits preferences into two categories:
- Settings that should logically apply to all sessions, because they are based on user workflow or system configuration
- Settings that are per session, because they depend or reflect session content or design
There are two separate (but similarly designed) dialogs, one under Edit > Preferences for the first category of preferences and Session > Properties for the second. Each window uses tabs to group a set of preferences
This chapter covers the following:
Preferences Dialog
Preferences Dialog

Seession Properties Dialog
Session Properties Dialog

Using Control Surfaces
Using Control Surfaces
Controlling Ardour with OSC
Controlling Ardour with OSC
Ardour is probably one of the most OSC-controllable audio applications around, but as with all OSC-controllable apps, you can't do much without knowing what messages can be sent. This document describes the various categories of messages that Ardour understands. It is subject to change, particular the "Actions" part below, since this relates to the GTK GUI for Ardour rather than the backend.
Connecting to Ardour via OSC
OSC support is not enabled by default, but can be turned on via Edit > Preferences > User Interaction. Once enabled, Ardour will listen on port 3819 by default. This port number can be changed by editing $ARDOUR_CONFIG and adding this line within the <Config> section:
<Option name="osc-port" value="YourChoiceHere"/>
Transport Control
- /ardour/transport_stop
- /ardour/transport_play
- /ardour/set_transport_speed [transport_speed]
- /ardour/transport_play
- where [transport_speed] is a float rangin from -8 to 8.
- /ardour/ffwd
- /ardour/rewind
- /ardour/goto_start
- /ardour/goto_end
- /ardour/add_marker
- /ardour/rewind
- (adds marker to the current transport position)
- /ardour/next_marker
- /ardour/prev_marker
- /ardour/locate [sample_pos] [with_roll]
- /ardour/prev_marker
- where [sample_pos] is the target position and [with_roll] is a bool/integer (whether you want transport to be kept rolling or not).
- /ardour/loop_toggle
Editing-related
- /ardour/undo
- /ardour/redo
- /ardour/save_state
- /ardour/redo
- (this is regular Session _> Save operatio)
Recording control
- /ardour/toggle_punch_in
- /ardour/toggle_punch_out
- /ardour/rec_enable_toggle
- /ardour/toggle_all_rec_enables
- /ardour/toggle_punch_out
- (toggles all tracks recording state). !currently toggles on but not off for 2.0 branch.
Track specific operations
For each of the following, [remote_id] is the remote_id or the track
- /ardour/routes/mute [remote_id] [mute_st]
- where [mute_st] is a bool/int representing the desired mute state of the track
- /ardour/routes/solo [remote_id] [solo_st]
- where [solo_st] is a bool/int representing the desired solo state of the track
- /ardour/routes/recenable [remote_id] [rec_st]
- where [rec_st] is a bool/int representing the desired rec state of the track
- /ardour/routes/gainabs [remote_id] [gain_abs]
- where [gain_abs] is a float ranging from 0 to 2 (0 being -infinite, 1 being 0dB and 2 being +6dB).
- /ardour/routes/gaindB [remote_id] [gain_db]
- where [gain_db] is a float ranging from -400 to 6 representing the desired gain of the track in dB.
Menu actions
Every single menu item in Ardour's GUI is accessible via OSC. There is
a single common syntax to trigger the action as if it was selected
with the mouse (or keyboard):
/ardour/access_action [action_name]
The list below shows all available values of [action-name] as of
mid-March 2010 for Ardour 2.X. You can get the current list at any
time by running Ardour with the -b flag.
- Common/About
- Common/goto-editor
- Common/Quit
- Common/Save
- Common/toggle-editor-mixer-on-top
- Common/ToggleBigClock
- Common/ToggleColorManager
- Common/ToggleInspector
- Common/ToggleKeyEditor
- Common/ToggleLocations
- Common/ToggleMaximalEditor
- Common/ToggleOptionsEditor
- Editor/add-location-from-playhead
- Editor/addExistingAudioFiles
- Editor/align-regions-end
- Editor/align-regions-start
- Editor/align-regions-start-relative
- Editor/align-regions-sync
- Editor/align-regions-sync-relative
- Editor/audition-at-mouse
- Editor/Autoconnect
- Editor/boost-region-gain
- Editor/brush-at-mouse
- Editor/center-edit-cursor
- Editor/center-playhead
- Editor/crop
- Editor/Crossfades
- Editor/CrossfadesFull
- Editor/CrossfadesShort
- Editor/cut-region-gain
- Editor/cycle-edit-point
- Editor/cycle-edit-point-with-marker
- Editor/cycle-snap-choice
- Editor/cycle-snap-mode
- Editor/duplicate-region
- Editor/Edit
- Editor/edit-cursor-to-next-region-sync
- Editor/edit-cursor-to-previous-region-start
- Editor/edit-cursor-to-previous-region-sync
- Editor/edit-cursor-to-range-end
- Editor/edit-cursor-to-range-start
- Editor/edit-to-playhead
- Editor/EditCursorMovementOptions
- Editor/editor-copy
- Editor/editor-cut
- Editor/editor-delete
- Editor/editor-paste
- Editor/EditSelectRangeOptions
- Editor/EditSelectRegionOptions
- Editor/export-region
- Editor/extend-range-to-end-of-region
- Editor/extend-range-to-start-of-region
- Editor/finish-add-range
- Editor/finish-range
- Editor/fit-tracks
- Editor/goto-mark-1
- Editor/goto-mark-2
- Editor/goto-mark-3
- Editor/goto-mark-4
- Editor/goto-mark-5
- Editor/goto-mark-6
- Editor/goto-mark-7
- Editor/goto-mark-8
- Editor/goto-mark-9
- Editor/goto-visual-state-1
- Editor/goto-visual-state-2
- Editor/goto-visual-state-3
- Editor/goto-visual-state-4
- Editor/goto-visual-state-5
- Editor/goto-visual-state-6
- Editor/goto-visual-state-7
- Editor/goto-visual-state-8
- Editor/goto-visual-state-9
- Editor/goto-visual-state-10
- Editor/goto-visual-state-11
- Editor/goto-visual-state-12
- Editor/insert-region
- Editor/insert-time
- Editor/invert-selection
- Editor/jump-backward-to-mark
- Editor/jump-forward-to-mark
- Editor/LayerAddHigher
- Editor/Layering
- Editor/LayerLaterHigher
- Editor/LayerMoveAddHigher
- Editor/MeterFalloff
- Editor/MeterHold
- Editor/Monitoring
- Editor/move-selected-tracks-down
- Editor/move-selected-tracks-up
- Editor/multi-duplicate-region
- Editor/mute-unmute-region
- Editor/naturalize-region
- Editor/normalize-region
- Editor/nudge-backward
- Editor/nudge-forward
- Editor/nudge-next-backward
- Editor/nudge-next-forward
- Editor/nudge-playhead-backward
- Editor/nudge-playhead-forward
- Editor/pitch-[Shift]-region
- Editor/pitch-shift-region
- Editor/play-edit-range
- Editor/play-from-edit-point-and-return
- Editor/play-selected-regions
- Editor/playhead-backward-to-grid
- Editor/playhead-forward-to-grid
- Editor/playhead-to-edit
- Editor/playhead-to-next-region-boundary
- Editor/playhead-to-next-region-boundary-noselection
- Editor/playhead-to-next-region-sync
- Editor/playhead-to-next-region-sync
- Editor/playhead-to-previous-region-boundary
- Editor/playhead-to-previous-region-boundary-noselection
- Editor/playhead-to-previous-region-sync
- Editor/playhead-to-range-end
- Editor/playhead-to-range-start
- Editor/PullupMinus1
- Editor/PullupMinus4
- Editor/PullupMinus4Minus1
- Editor/PullupMinus4Plus1
- Editor/PullupNone
- Editor/PullupPlus1
- Editor/PullupPlus4
- Editor/PullupPlus4Minus1
- Editor/PullupPlus4Plus1
- Editor/redo
- Editor/RegionEditOps
- Editor/remove-last-capture
- Editor/reverse-region
- Editor/save-visual-state-1
- Editor/save-visual-state-2
- Editor/save-visual-state-3
- Editor/save-visual-state-4
- Editor/save-visual-state-5
- Editor/save-visual-state-6
- Editor/save-visual-state-7
- Editor/save-visual-state-8
- Editor/save-visual-state-9
- Editor/save-visual-state-10
- Editor/save-visual-state-11
- Editor/save-visual-state-12
- Editor/scroll-tracks-down
- Editor/scroll-tracks-up
- Editor/select-all
- Editor/select-all-after-edit-cursor
- Editor/select-all-after-playhead
- Editor/select-all-before-edit-cursor
- Editor/select-all-before-playhead
- Editor/select-all-between-cursors
- Editor/select-all-in-loop-range
- Editor/select-all-in-punch-range
- Editor/select-all-within-cursors
- Editor/select-next-route
- Editor/select-prev-route
- Editor/select-range-between-cursors
- Editor/selected-marker-to-next-region-boundary
- Editor/selected-marker-to-previous-region-boundary
- Editor/separate
- Editor/set-edit-point
- Editor/set-fade-in-length
- Editor/set-fade-out-length
- Editor/set-loop-from-edit-range
- Editor/set-loop-from-region
- Editor/set-playhead
- Editor/set-punch-from-edit-range
- Editor/set-punch-from-region
- Editor/set-region-sync-position
- Editor/set-tempo-from-edit-range
- Editor/set-tempo-from-region
- Editor/show-editor-mixer
- Editor/Smpte24
- Editor/Smpte25
- Editor/Smpte30
- Editor/Smpte30drop
- Editor/Smpte60
- Editor/Smpte2997
- Editor/Smpte5994
- Editor/Smpte2997drop
- Editor/Smpte23976
- Editor/Smpte24976
- Editor/snap-magnetic
- Editor/snap-normal
- Editor/SnapMode
- Editor/SnapTo
- Editor/Solo
- Editor/split-region
- Editor/start-range
- Editor/step-tracks-down
- Editor/step-tracks-up
- Editor/Subframes
- Editor/Subframes100
- Editor/Subframes80
- Editor/tab-to-transient-backwards
- Editor/tab-to-transient-forwards
- Editor/temporal-zoom-in
- Editor/temporal-zoom-out
- Editor/Timecode
- Editor/toggle-auto-xfades
- Editor/toggle-edit-mode
- Editor/toggle-fade-out-active
- Editor/toggle-fade-out-active
- Editor/toggle-follow-playhead
- Editor/toggle-internal-edit
- Editor/toggle-rhythm-ferret
- Editor/toggle-xfades-active
- Editor/toggle-xfades-visible
- Editor/toggle-zoom
- Editor/ToggleGeneric MIDISurface
- Editor/ToggleGeneric MIDISurfaceFeedback
- Editor/ToggleGeneric MIDISurfaceSubMenu
- Editor/ToggleMeasureVisibility
- Editor/ToggleWaveformsWhileRecording
- Editor/ToggleWaveformVisibility
- Editor/track-record-enable-toggle
- Editor/trim-back
- Editor/trim-from-start
- Editor/trim-front
- Editor/trim-to-end
- Editor/undo
- Editor/View
- Editor/zoom-to-region
- Editor/zoom-to-region-both-axes
- Editor/zoom-to-session
- Editor/ZoomFocus
- JACK/JACK
- JACK/JACKDisconnect
- JACK/JACKReconnect
- JACK/JACKLatency32
- JACK/JACKLatency64
- JACK/JACKLatency128
- JACK/JACKLatency256
- JACK/JACKLatency512
- JACK/JACKLatency1024
- JACK/JACKLatency2048
- JACK/JACKLatency4096
- JACK/JACKLatency8192
- Main/AddTrackBus
- Main/AudioFileFormat
- Main/AudioFileFormatData
- Main/AudioFileFormatHeader
- Main/CleanupUnused
- Main/FlushWastebasket
- Main/Close
- Main/ControlSurfaces
- Main/Export
- Main/ExportRangeMarkers
- Main/ExportSelection
- Main/ExportSession
- Main/Help
- Main/KeyMouse Actions
- Main/Metering
- Main/MeteringFallOffRate
- Main/MeteringHoldTime
- Main/New
- Main/Open
- Main/Options
- Main/Recent
- Main/SaveTemplate
- Main/Session
- Main/Snapshot
- Main/TransportOptions
- Main/Windows
- MouseMode/set-mouse-mode-gain
- MouseMode/set-mouse-mode-object
- MouseMode/set-mouse-mode-range
- MouseMode/set-mouse-mode-timefx
- MouseMode/set-mouse-mode-zoom
- options/DoNotRunPluginsWhileRecording
- options/FileDataFormat24bit
- options/FileDataFormatFloat
- options/FileHeaderFormatBWF
- options/FileHeaderFormatCAF
- options/FileHeaderFormatWAVE
- options/FileHeaderFormatWAVE64
- options/GainReduceFastTransport
- options/InputAutoConnectManual
- options/InputAutoConnectPhysical
- options/LatchedRecordEnable
- options/LatchedSolo
- options/MeterFalloffFast
- options/MeterFalloffFaster
- options/MeterFalloffFastest
- options/MeterFalloffMedium
- options/MeterFalloffOff
- options/MeterFalloffSlow
- options/MeterFalloffSlowest
- options/MeterHoldLong
- options/MeterHoldMedium
- options/MeterHoldOff
- options/MeterHoldShort
- options/OutputAutoConnectManual
- options/OutputAutoConnectMaster
- options/OutputAutoConnectPhysical
- options/RegionEquivalentsOverlap
- options/SendMMC
- options/SendMTC
- options/ShowSoloMutes
- options/SoloInPlace
- options/SoloViaBus
- options/StopPluginsWithTransport
- options/StopRecordingOnXrun
- options/StopTransportAtEndOfSession
- options/UseExternalMonitoring
- options/UseHardwareMonitoring
- options/UseMMC
- options/UseSoftwareMonitoring
- options/VerifyRemoveLastCapture
- redirectmenu/activate
- redirectmenu/activate_all
- redirectmenu/clear
- redirectmenu/copy
- redirectmenu/cut
- redirectmenu/deactivate
- redirectmenu/deactivate_all
- redirectmenu/deselectall
- redirectmenu/edit
- redirectmenu/newinsert
- redirectmenu/newplugin
- redirectmenu/newsend
- redirectmenu/paste
- redirectmenu/rename
- redirectmenu/selectall
- RegionList/RegionListSort
- RegionList/RegionListSort
- RegionList/rlAudition
- RegionList/rlHide
- RegionList/rlRemove
- RegionList/rlShowAll
- RegionList/rlShowAuto
- RegionList/SortAscending
- RegionList/SortByRegionEndinFile
- RegionList/SortByRegionLength
- RegionList/SortByRegionName
- RegionList/SortByRegionPosition
- RegionList/SortByRegionStartinFile
- RegionList/SortByRegionTimestamp
- RegionList/SortBySourceFileCreationDate
- RegionList/SortBySourceFileLength
- RegionList/SortBySourceFileName
- RegionList/SortBySourceFilesystem
- RegionList/SortDescending
- ShuttleActions/SetShuttleUnitsPercentage
- ShuttleActions/SetShuttleUnitsSemitones
- Snap/snap-to-asixteenthbeat
- Snap/snap-to-bar
- Snap/snap-to-beat
- Snap/snap-to-cd-frame
- Snap/snap-to-edit-cursor
- Snap/snap-to-eighths
- Snap/snap-to-frame
- Snap/snap-to-mark
- Snap/snap-to-minutes
- Snap/snap-to-quarters
- Snap/snap-to-region-boundary
- Snap/snap-to-region-end
- Snap/snap-to-region-start
- Snap/snap-to-region-sync
- Snap/snap-to-seconds
- Snap/snap-to-smpte-frame
- Snap/snap-to-smpte-minutes
- Snap/snap-to-smpte-seconds
- Snap/snap-to-thirds
- Snap/snap-to-thirtyseconds
- Transport/focus-on-clock
- Transport/Forward
- Transport/GotoEnd
- Transport/GotoStart
- Transport/GotoZero
- Transport/Loop
- Transport/PlaySelection
- Transport/Record
- Transport/record-roll
- Transport/Rewind
- Transport/ToggleAutoInput
- Transport/ToggleAutoPlay
- Transport/ToggleAutoReturn
- Transport/ToggleClick
- Transport/TogglePunchIn
- Transport/TogglePunchOut
- Transport/ToggleRoll
- Transport/ToggleRollForgetCapture
- Transport/ToggleRollMaybe
- Transport/ToggleTimeMaster
- Transport/ToggleVideoSync
- Transport/TransitionToReverse
- Transport/TransitionToRoll
- Zoom/zoom-focus-center
- Zoom/zoom-focus-edit
- Zoom/zoom-focus-left
- Zoom/zoom-focus-playhead
- Zoom/zoom-focus-right
Devices using Mackie/Logic Control Protocol
Devices using Mackie/Logic Control Protocol
This will walk you through the process of configuring and using a MIDI control surface with Ardour that uses the Mackie Control protocol or the Logic Control protocol. Devices that have been tested and are known to work include the SSL Nucleus, Mackie Control Pro (plus extenders), Behringer devices in Mackie/Logic mode, and Steinberg CMC devices.
See the bottom of this page for links to device-specific information.
Preparing your device for use with Ardour
Each interface model probably has some necessary setup so it's in the state Ardour expects to identify it. See your control surface page to see what's necessary. If there is no page about your control surface, create one!
Preparation
Please see the platform specific pages for:
Enabling Mackie Control in Ardour
Navigate to Edit > Preferences > User Interaction. Double-click on "Mackie Control" to see the setup dialog:
From the selector at the top, choose the type of device you are using. (What do do if your device is not listed).
Once your setup is complete, click "OK" to close the dialog. Now click on the enable checkbox for "Mackie Control".
Connecting control surface and Ardour MIDI ports
If you are using a device that uses ipMIDI such as the SSL Nucleus, no MIDI port connections are required - Ardour and your control surface will be able to talk to each other automatically.
If you are using a device that uses "normal" MIDI (via a standard MIDI or USB cable), you need to connect Ardour's Mackie Control ports to the MIDI ports corresponding to the control surface.
Now that you have both control surface and Ardour MIDI ports available, cross connect the control surface MIDI ports and the two mackie ports.
Once you have made these connections once, Ardour will recreate them when it is started in the future (as long as you leave Mackie Control enabled as a control protocol).
Customizing your control surface
Every possible Mackie Control button can be bound to any action present in Ardour's GUI.
Please check your control surface page for suggestions.
Behringer devices in Mackie/Logic Control Mode
No special setup is required.
Mackie Control Setup on Linux
Devices using ipMIDI
If you are using a device like the SSL Nucleus that uses ipMIDI, no set up is required other than to ensure that your control surface and computer are both connected to the same network.
Devices using conventional MIDI
Before attempting to use a Mackie Control device that communicates via a standard MIDI cable or a USB cable, you should ensure that your Linux MIDI environment is setup.
SSL Nucleus
MIDI Binding Maps
MIDI Binding Maps
Ardour 2.X supported MIDI learning for more or less any control. This was a nice feature that quite a few other DAWs have now provided, but it didn't allow Ardour to work "out of the box" with sensible defaults for existing commercial MIDI controllers. In Ardour 3 and later versions, we have augmented the MIDI learn feature with the ability to load a MIDI binding map for a given controller, which can set up an arbitrary number of physical controls with anything inside Ardour that can be controlled. At this time, these binding maps need to be created with a text editor, but we currently have presets for
- Behringer BCF 2000
- Korg_nanoKONTROL
- M-Audio Oxygen 8 v2
- Roland SI-24
- Behringer DDX3216
- M-Audio Axiom 25
MIDI binding maps are accessible by double clicking on the "Generic MIDI" line in the Control Surfaces tab of the Ardour preferences dialog. Ardour will retain your chosen map after you choose one.
The information below describes in great detail how to create a new MIDI binding map.
The Basic Concept
Since the beginning of time (well, sometime early in the 2.X series), Ardour has had the concept of identifying each track and bus with a remote control ID. This ID uniquely identifies a track or bus so that when messages arrive from elsewhere (MIDI or OSC), we can determine which track or bus they are intended to control. Ardour has a number of ways of assigning remote control IDs, but they don't really matter very much when creating MIDI binding maps, so we won't discuss that here. You just need to know that there is a "first track" and its remote control ID is 1, and so on.
Getting Started
MIDI bindings are stored in files with the suffix ".map" attached to their name. The minimal content looks like this:
<?xml version="1.0" encoding="UTF-8"?>
<ArdourMIDIBindings version="1.0.0" name="The name of this set of bindings">
</ArdourMIDIBindings>
So, to start, create a file with that as the initial contents.
Finding out what your MIDI control surface sends
This is the most complex part of the job, but its still not very hard. You need to connect the control surface to an application that will show you the information that the device sends each time you modify a knob, slider, button etc. There are a variety of such applications (notably gmidimon and kmidimon, but you can actually use Ardour for this if you want. Start Ardour in a terminal window, connect MIDI ports up, and in the Preferences window, enable "Trace Input" on the relevant MIDI port. A full trace of the MIDI data received will show up in the terminal window. (Note: in Ardour3, you get a dedicated, custom dialog for this kind of tracing)
Types of Bindings
There are two basic kinds of bindings you can make between a MIDI message and something inside Ardour. The first is a binding to a specific parameter of a track or bus. The second is a binding to a function that will change Ardour's state in some way.
Binding to Track/Bus controls
A track/bus binding has one of two basic structures
  <Binding msg specification  uri="... control address ..."/>
  <Binding msg specification  function="... function name ..."/>
Message specifications
You can create a binding for either 3 types of channel messages, or for a system exclusive ("sysex") message. A channel message specification looks like this:
<Binding channel="1" ctl="13" ....
This defines a binding for a MIDI Continuous Controller message involving controller 13, arriving on channel 1. There are 16 MIDI channels, numbered 1 to 16. Where the example above says ctl, you can alternatively use note (to create binding for a Note On message) or pgm (to create a binding for a Program Change message).
You can also bind sysex messages:
  <Binding sysex="f0 0 0 e 9 0 5b f7" ....
  <Binding sysex="f0 7f 0 6 7 f7" ....
The string after the sysex= part is the sequence of MIDI bytes, as hexadecimal values, that make up the sysex message.
Finally, you can bind a totally arbitrary MIDI message:
  <Binding msg="f0 0 0 e 9 0 5b f7" ....
  <Binding msg="80 60 40" ....
The string after the msg= part is the sequence of MIDI bytes, as hexadecimal values, that make up the message you want to bind. Using this is slightly less efficient than the other variants shown above, but is useful for some oddly designed control devices.
Control address
A control address defines what the binding will actually control. There are quite a few different things that can be specified here:
- /route/gain
- the gain control ("fader") for the track/bus
- /route/solo
- a toggleable control for solo (and listen) of the track/bus
- /route/mute
- a toggleable control to mute/unmute the track/bus
- /route/recenable
- a toggleable control to record-enable the track
- /route/panwidth
- interpreted by the track/bus panner, should control image "width"
- /route/pandirection
- interpreted by the track/bus panner, should control image "direction"
- /route/plugin/parameter
- the Mth parameter of the Nth plugin of a track/bus
- /route/send/gain
- the gain control ("fader") of the Nth send of a track/bus
Each of the specifications needs an address, which takes various forms too. For track-level controls (solo/gain/mute/recenable), the address is one the following:
- a number, eg. "1"
- identifies a track or bus by its remote control ID
- B, followed by a number
- identifies a track or bus by its remote control ID within the current bank (see below for more on banks)
- one or more words
- identifies a track or bus by its name
For send/insert/plugin controls, the address consists of a track/bus address (as just described) followed by a number identifying the plugin/send (starting from 1). For plugin parameters, there is an additional third component: a number identifying the plugin parameter number (starting from 1).
One additional feature: for solo and mute bindings, you can also add momentary="yes" after the control address. This is useful primarily for NoteOn bindings - when Ardour gets the NoteOn it will solo or mute the targetted track or bus, but then when a NoteOff arrives, it will un-solo or un-mute it.
Bindings to Ardour "functions"
Rather than binding to a specific track/bus control, it may be useful to have a MIDI controller able to alter some part of Ardour's state. A binding definition that does this looks like this:
<Binding channel="1" note="13" function="transport-roll"/>
In this case, a NoteOn message for note number 13 (on channel 1) will start the transport rolling. The following function names are available:
transport-stop- stop the transport
transport-roll- start the transport "rolling"
transport-zero- move the playhead to the zero position
transport-start- move the playhead to the start marker
transport-end- move the playhead to the end marker
loop-toggle- turn on loop playback
rec-enable- enable the global record button
rec-disable- disable the global record button
next-bank- Move track/bus mapping to the next bank (see Banks below)
prev-bank- Move track/bus mapping to the previous bank (see Banks below)
Binding to Ardour "actions"
You can also bind a sysex or arbitrary message to any of the items that occur in Ardour's main menu (and its submenus). The best place to look for the (long) list of how to address each item is in your keybindings file, which will contain lines that look like this:
(gtk_accel_path "<Actions>/Editor/temporal-zoom-in" "equal")
To create a binding between an arbitrary MIDI message (we'll use a note-off on channel 1 of MIDI note 60 (hex) with release velocity 40 (hex)), the binding file would contain:
<Binding msg="80 60 40" action="Editor/temporal-zoom-in"/>
The general rule, when taken an item from the keybindings file and using it in a MIDI binding is to simply strip the <Action> prefix of the second field in the keybinding definition.
Banks and Banking
Because many modern control surfaces offer per-track/bus controls for far fewer tracks & busses than many users want to control, Ardour offers the relatively common place concept of "banks". Banks to allow you to relatively easily control any number of tracks and/or busses regardless of how many faders/knobs etc. your control surface has. To use banking, the control addresses must be specified using the bank relative format mentioned above ("B1" to identify the first track of a bank of tracks, rather than "1" to identify the first track).
One very important extra piece of information is required to use banking: an extra line near the start of the list of bindings that specifies how many tracks/busses to use per bank. If the device has 8 faders, then 8 would be a sensible value to use for this. The line looks like this:
<DeviceInfo bank-size="8"/>
In addition, you probably want to ensure that you bind something on the control surface to the next-bank and prev-bank functions, otherwise you and other users will have to use the mouse and the GUI to change banks, which rather defeats the purpose of the bindings.
A Complete (though muddled) Example
<?xml version="1.0" encoding="UTF-8"?>
<ArdourMIDIBindings version="1.0.0" name="pc1600x transport controls">
  <DeviceInfo bank-size="16"/>
  <Binding channel="1" ctl="1"   uri="/route/gain B1"/>
  <Binding channel="1" ctl="2"   uri="/route/gain B2"/>
  <Binding channel="1" ctl="3"   uri="/route/send/gain B1 1"/>
  <Binding channel="1" ctl="4"   uri="/route/plugin/parameter B1 1 1"/>
  <Binding channel="1" ctl="6"   uri="/bus/gain master"/>

  <Binding channel="1" note="1"  uri="/route/solo B1"/>
  <Binding channel="1" note="2"  uri="/route/solo B2" momentary="yes"/>

  <Binding channel="1" note="15"  uri="/route/mute B1" momentary="yes"/>
  <Binding channel="1" note="16"  uri="/route/mute B2" momentary="yes"/>

  <Binding sysex="f0 0 0 e 9 0 5b f7" function="transport-start"/>
  <Binding sysex="f0 7f 0 6 7 f7" function="rec-disable"/>
  <Binding sysex="f0 7f 0 6 6 f7" function="rec-enable"/>
  <Binding sysex="f0 0 0 e 9 0 53 0 0 f7" function="loop-toggle"/>

  <Binding channel="1" note="13" function="transport-roll"/>
  <Binding channel="1" note="14" function="transport-stop"/>
  <Binding channel="1" note="12" function="transport-start"/>
  <Binding channel="1" note="11" function="transport-zero"/>
  <Binding channel="1" note="10" function="transport-end"/>
</ArdourMIDIBindings>
Please note that channel, controller and note numbers are specified as decimal numbers in the ranges 1-16, 0-127 and 0-127 respectively (the channel range may change at some point)